
Tying Springs (Day 6 of 31)
This is a continuation of gluing the frame....and day 6 of the challenge...for all 31 days, go here
Once your frame is sturdy, you are ready to tackle the springs. I am not an expert in tying springs...so If you are looking for the perfect way to do spring work, I suggest you go to YouTube, where you will find an overload of videos. If, however, you are looking for a perfectly functional way to do spring work....maybe this will work for you
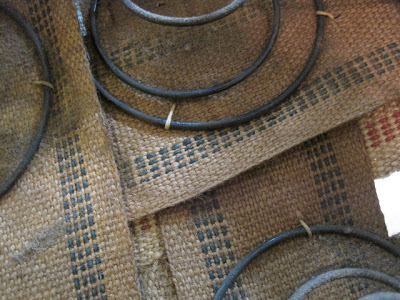
With a shop-vac, I cleaned off the years of dust, and ....whatever. Counting around the circle of one spring, you will see that this is a 4-way tied spring (the amount of knots on one spring)

You will notice that the springs are tied on the top layer

This chair has obviously been re-tied. Notice how old strings are brown in color and not attached to anything. The old strings are tied into the fresh cream ones, so I will trim them, but not remove all of them.

The bottom of the springs are hand sewn to the jute webbing. I will address that later.
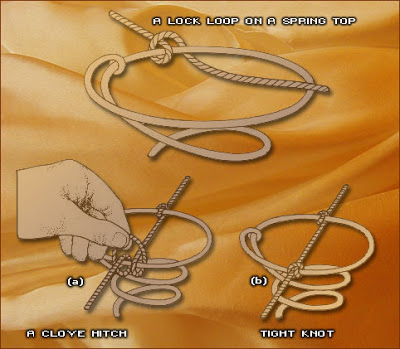
This is the proper way to tie a knot on a spring. I will be honest with you, it is a bit confusing to follow, so some of my springs are not done perfectly, but they are perfectly functional.
This is what an 8-way hand tied spring looks like. 8 knots on one spring. It is the Rolls Royce of industry standards. The goal is for all springs to work as a unit. Each rope pulls on the next spring which will provide for a uniform look to your seat, ottoman, etc.
I used this package of rope

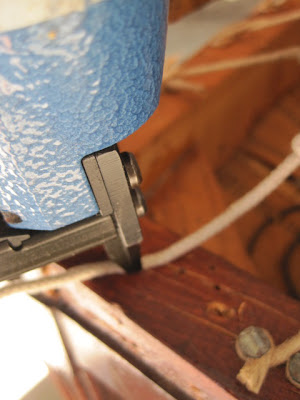
Examining my springs and current rope, I have decided that I will reinforce the current rope to the chair. Working from the top side of the chair, using my staple gun, I apply several staples above the current nails

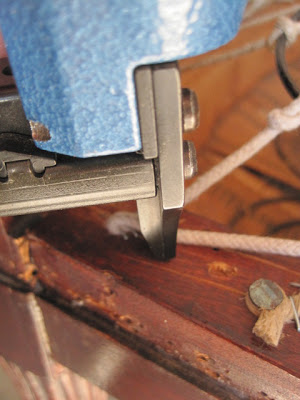
Next, I tied the rope (as best I could) like the above diagram and stapled down the new rope keeping the tension on the spring as uniform as possible
To lock the rope, fold it back on itself and staple again, trim off excess
Now you have a secure tied rope on your spring. Continue adding rope where needed. Here is my finished spring work. Note that not all of the springs are 8-way tied. I did what I thought would be perfectly fine....you decide for yourself.
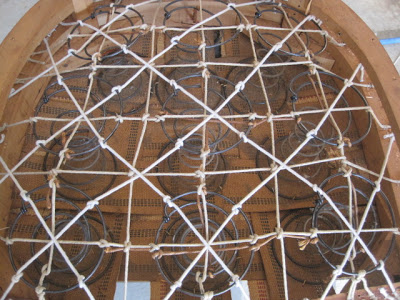 The important thing is that all the springs carry the same amount of pressure and have a uniform look.
Tomorrow, I will show you how I handled the webbing on the bottom of the chair under the springs.
Once your frame is sturdy, you are ready to tackle the springs. I am not an expert in tying springs...so If you are looking for the perfect way to do spring work, I suggest you go to YouTube, where you will find an overload of videos. If, however, you are looking for a perfectly functional way to do spring work....maybe this will work for you
With a shop-vac, I cleaned off the years of dust, and ....whatever. Counting around the circle of one spring, you will see that this is a 4-way tied spring (the amount of knots on one spring)
You will notice that the springs are tied on the top layer
This chair has obviously been re-tied. Notice how old strings are brown in color and not attached to anything. The old strings are tied into the fresh cream ones, so I will trim them, but not remove all of them.
The bottom of the springs are hand sewn to the jute webbing. I will address that later.
This is the proper way to tie a knot on a spring. I will be honest with you, it is a bit confusing to follow, so some of my springs are not done perfectly, but they are perfectly functional.
 |
| Heritage Upholstery |
This is what an 8-way hand tied spring looks like. 8 knots on one spring. It is the Rolls Royce of industry standards. The goal is for all springs to work as a unit. Each rope pulls on the next spring which will provide for a uniform look to your seat, ottoman, etc.
 |
| Heritage Upholstery |
Examining my springs and current rope, I have decided that I will reinforce the current rope to the chair. Working from the top side of the chair, using my staple gun, I apply several staples above the current nails
Next, I tied the rope (as best I could) like the above diagram and stapled down the new rope keeping the tension on the spring as uniform as possible
To lock the rope, fold it back on itself and staple again, trim off excess
Now you have a secure tied rope on your spring. Continue adding rope where needed. Here is my finished spring work. Note that not all of the springs are 8-way tied. I did what I thought would be perfectly fine....you decide for yourself.
Tomorrow, I will show you how I handled the webbing on the bottom of the chair under the springs.