

Powder Room One Room Challenge - The Plan
Hello Dear Reader! I’m back for another season of the unpredictable One Room Challenge. After recently completing my cozy conservatory/sunroom, I thought I would tackle something much smaller, and potentially more controllable - the powder room.
Hello Dear Reader! I’m back for another season of the unpredictable One Room Challenge. After recently completing my cozy conservatory/sunroom, I thought I would tackle something much smaller, and potentially more controllable - the powder room. It’s a small square box (6’ x 6’) with just enough room for a 30” vanity and maybe a plant stand. I’m still in my coastal-cottage era and would love to wrap the walls with a lovely blue and white wallpaper. Did I mention I’ve never wallpapered before?! Let’s discuss…..

wallpaper vanity, mirror, sconce, shade, stool
I can’t even tell you how difficult it is to make a wallpaper decision. I’ve ordered countless samples, polled several opinions, and will be ordering something this week.

1 2 3 4 5 6 7 8
I’ll probably regret saying this, but how hard can it be to transform a small powder room. Next time, I’ll show you the room and what it looks like right now. Be sure to check in on all the other incredible One Room Challenge transformations.

How To Take High Quality Interior Photos
In my previous post, I shared the story of my One Room Challenge® living area renovation project. I didn't mention the photography, however, and that is a story in and of itself.
In my previous post, I shared the story of my One Room Challenge® living area renovation project. I didn't mention the photography, however, and that is a story in and of itself.
This renovation extended far beyond the room I transformed for the ORC and was years in the making. Including my own planning, working with an architect, the HOA approval, hiring a contractor, and two hurricanes, a lot of time and effort went into the project. The ORC project is an area of the house I'd mostly neglected, so it was basically like creating a room from scratch. You can read all the deets here. Now, I'll just say that I love my new room, I'm proud of my work, and I wanted high quality images for the One Room Challenge® that would reflect the room I worked to create. Having no photography experience or equipment, I had hired a photographer far in advance. After several weather related rescheduling issues, the photographer was no longer available.

UGH. After phone venting to friends, I was able to calmly reflect and strategize. No way was I going to allow the unreliable weather to prevent me from having the photos I imagined. Thankfully, I've got a couple of friends who have a little experience with interior photography. They assured me that with a little basic, beginner friendly equipment, I could do this myself. They recommended the products below which I promptly purchased. They also volunteered to do the photo editing. Whew!


The Canon EOS Rebel was recommended because it has the best balance between quality, beginner-friendliness, and cost. This camera was so easy to learn to operate and will be getting lots of use in the future.
This tether cable is so. cool. It creates a live connection between your camera and your computer, which allows you to see your photos as you take them. Without this thing, I would have been stuck taking the memory card out of the camera and putting it in my computer every few minutes to double check my angle/exposure/etc.. Seeing them nice and big on a screen as you go is truly a game changer.
You may need this USB-C to USB 3.1 adapter if you want to plug your camera into both your laptop and your desktop computers, or if you have a newer Macbook and your tether cable has a regular USB-C port.
To get sharp images a tripod is imperative. Because of the way exposure affects shutter speed, you will never get a nice image of a room shooting without one.
The tether cables are available with all different combinations of connectors, but this USB C to Mini USB Adapter came in handy when my camera turned out to have a different kind of port than I was expecting.
Don’t forget to get a memory card for your camera. You shouldn’t need one bigger than 32GB unless you’re planning to shoot a wedding (or something similar).
Use a website that easily explains everything you need to know as a beginner photographer. I like Photography Life. They’re also on YouTube with short, easy to follow tutorials.
If you have a friend who’s good at photo editing, hit them up. If not, all the freelance sites have skilled folks who will do a fantastic job for a reasonable price and a quick turnaround time.
If you go the tethered route (which I highly recommend) you’ll need software that will upload and instantly display the photo you’re taking on your laptop screen. I used Canon EOS Utility.
Now I have a camera, battery charger, memory cards, tether, cords, adapters, etc., I’m keeping them all corralled in this backpack so that I don’t have to hunt for equipment when I need it.
If you’re interested in interior design, you likely have friends that are too. Email your images to them for feedback. It’s so easy to miss little details like an electrical cord that could be easily hidden for a cleaner photo. They might suggest a crop that creates a better composition, or a perspective you haven’t thought of. IMO, the more eyes the better.
I’m actually thankful now for the never-ending rain that put me in the position to learn that I’m able to take my own photos. I love knowing I have all the equipment I need right here at home ready to go. I’ll definitely be participating in the One Room Challenge® again, and will have plenty of opportunities to put my new skills to use. And, if I can do it, so can you! Check out a few of my photos below and go to the original post to see them all.


English Conservatory Meets Florida Sunroom - Finale
It’s a stunningly beautiful day, the air is crisp and the house is quiet. I feel at home in my newly updated sunroom and I can’t wait to give you a tour.
Welcome back to the final installment of my sunroom. If you’ve missed any of this One Room Challenge series you can find weekly updates here: Intro, The Plan, Custom Windows, Design Changes & Lighting, Renovation Reality
It’s a stunningly beautiful day, the air is crisp, and the house is quiet. I feel at home in my newly updated sunroom, and I can’t wait to give you a tour. This room has been finished for a while, but the weather wasn’t allowing me to capture the gorgeous views through the incredible wall of windows.


The ‘before’
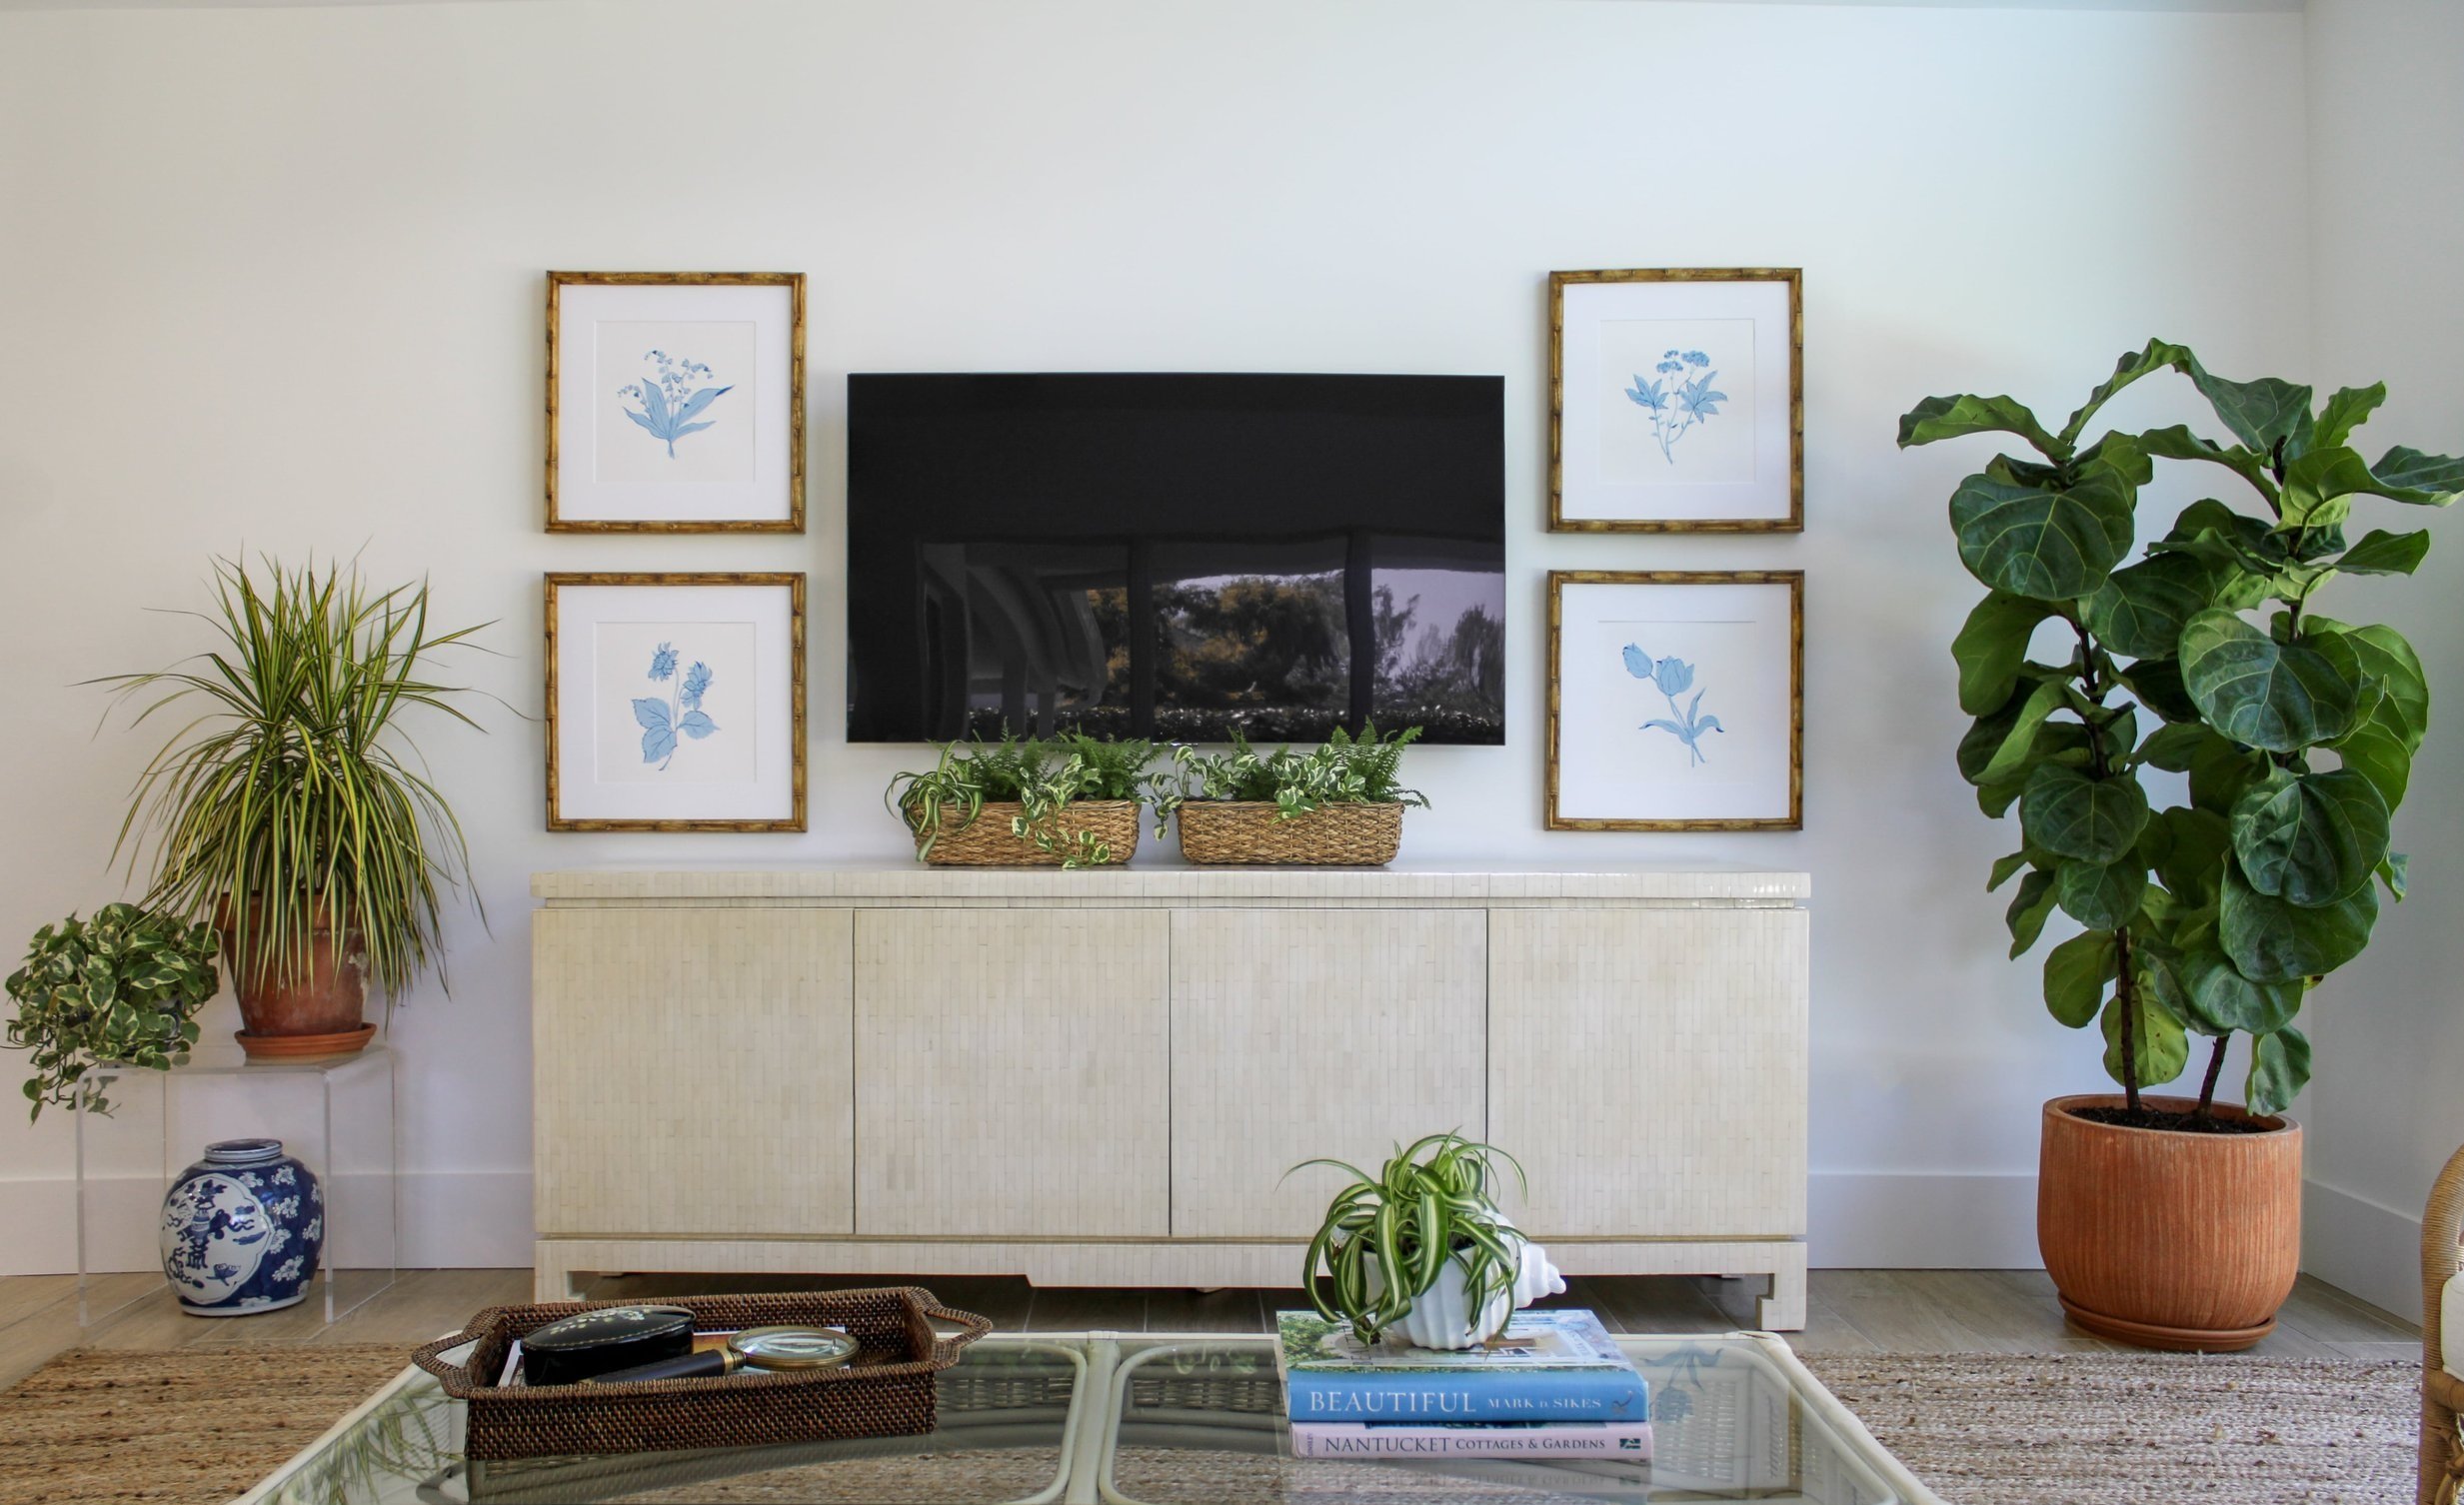
I started this project with the goal of creating a cozy space filled with pieces that felt collected over time. I’m definitely not a minimalist but clutter makes me anxious, so finding that balance is an ongoing process. The statement piece, the vintage credenza from my in-laws home, grounds the room and draws you into the space. This gorgeous piece centered the wall perfectly, and I hope it continues to stay in the family for decades.


I didn’t want to pretend we don’t watch TV in this room. We’re obsessed with streaming, aren’t you? The television screen doesn’t bother me, but it’s not art and the wall needed beautiful art to balance the weight of TV. I was ecstatic when Virginia, at Wishbone Studio, sent me her ideas for custom paintings. In my wildest dreams, I would not have been able to imagine anything more beautiful for this space. I knew they were going to be pretty and when the original floral paintings arrived, my expectations were exceeded! The details are incredible with layers of soft blues on a crisp white background. The collection has received many compliments and it feels good to have original art.
Let’s talk about the happy accident, this blue sofa. I wasn’t planning on a blue, and if you remember, I purchased a pretty neutral shade that ended in disaster. The blue upholstery contributes to the relaxing happy vibe of the room and lowers my anxiety by not having to monitor pets and feet on a lighter shade of fabric.
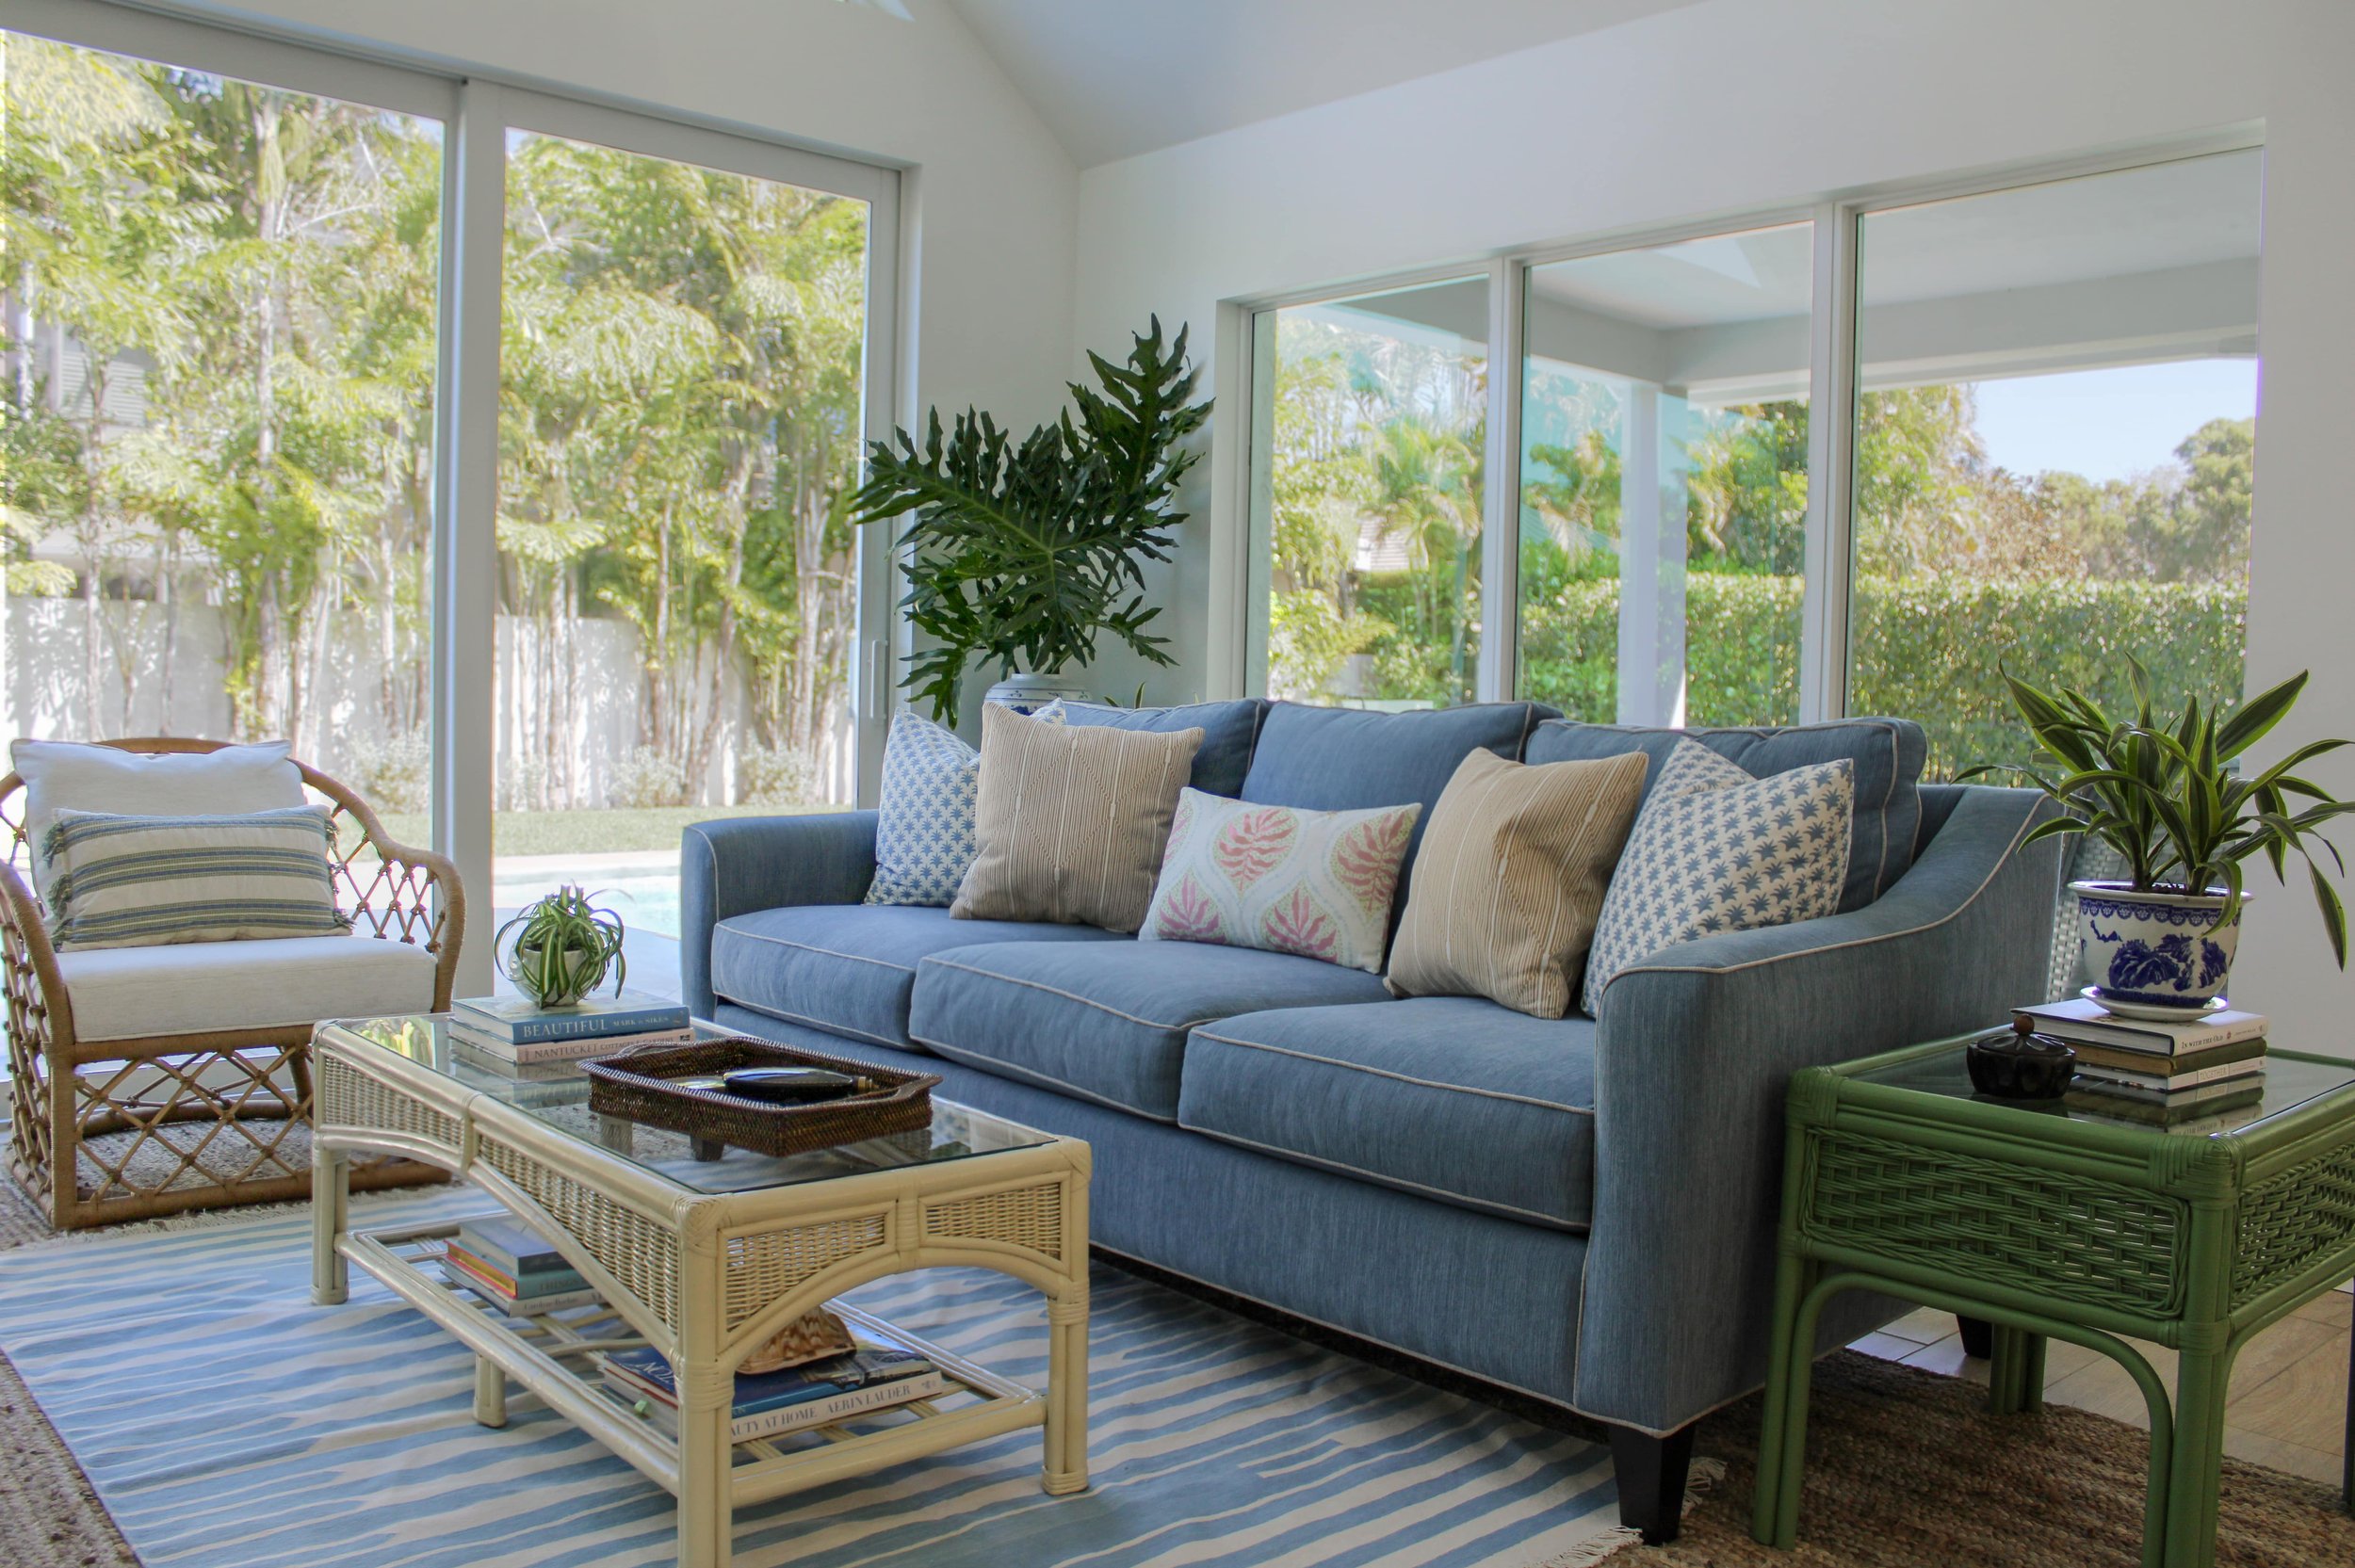
How about some pillow talk? When the sofa was going to be neutral, the pillows needed to have a punch of color. Now that the sofa has more personality and color, the pillows need to compliment the setting without being too attention-seeking. I like having the option to shuffle the pillows around between the sofa and the chairs.


Pink Botanical Lumbar - available here

Blue/Green (similar) - available here

Blue and white Mini Palm - available here

Diamond Outdoor Pillow - available here
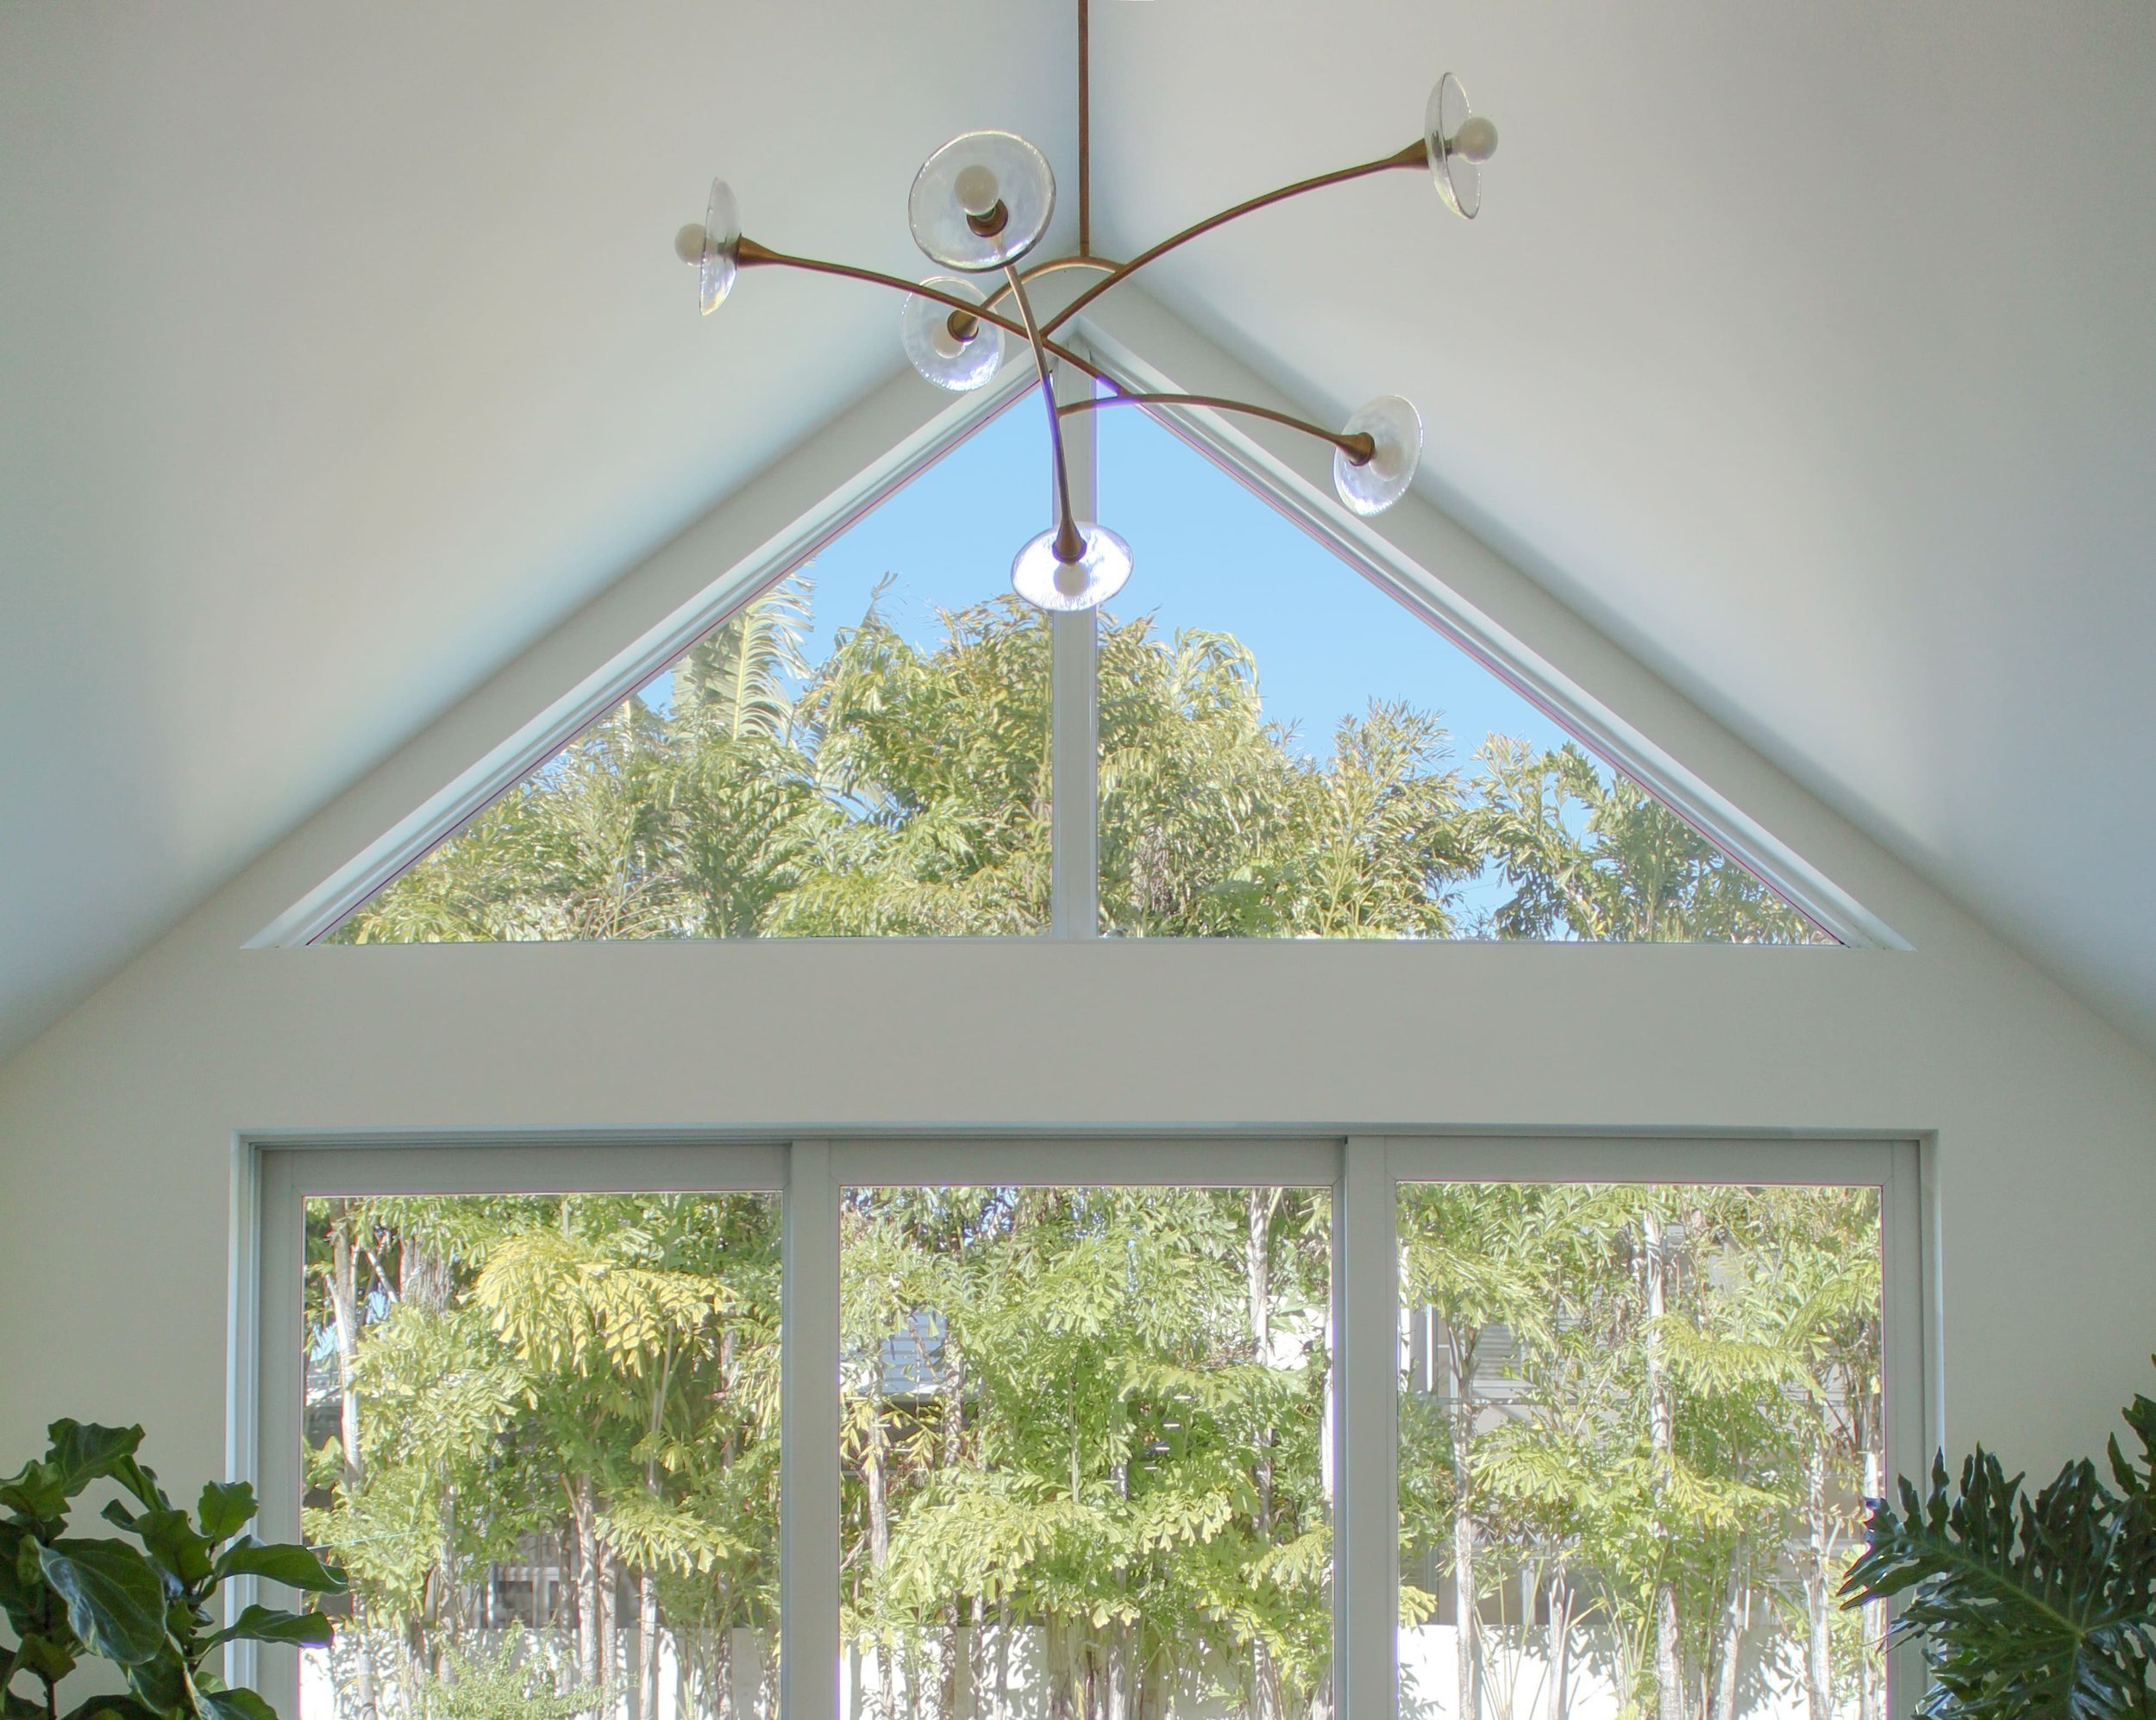
Without a doubt, the triangular PGT windows perfectly frame both the architecture of the room and the captivating sky view. Finding a light fixture that would compliment the windows without obstructing the view was challenging. I wanted something that felt organic and light, with enough weight and presence for the 13’ ceiling height. This one has been discontinued, but similar ones here.

I’ll never tire of this view! We’ve lived here for almost ten years and it feels incredibly reassuring to finally have a beautiful space wrapped in the protection of a new roof and hurricane grade windows. Thanks for following along. Next up - my powder room!
This room is part of the fall One Room Challenge®, be sure to check out all the final room reveals!

English Conservatory Meets Florida Sunroom - Renovation Reality
I wanted everything painted in one color, a flat finish for the walls and satin for the trim (repeated too many times) but my painters had other ideas. Of course I agonized on the perfect shade of white paint, don’t we all? I wanted a neutral white that didn’t read warm or cold. I’ll spare you with all the trials I ran and cut to the chase, for me, it’s Sherwin Williams Pure White
Welcome back to the evolution of my Florida home. If you’ve missed any of this One Room Challenge series you can find weekly updates here: Intro, The Plan, Custom Windows, Design Changes & lighting, Renovation Reality
Things aren’t going as planned and that’s the nature of renovations, design dilemmas, and supply-chain issues. Let’s discuss.
I’ve been through a few home renovations and troubleshooting issues is part of the process. When something goes off-course, I need to sit with the problem and give myself time to audition possible solutions. Ideally, the result is an unexpected happy accident, but rushing a decision is neither pleasant nor advisable.
One place things went awry with this project was the paint. Leading up to painting, I agonized over the perfect shade of white paint (don’t we all?). I wanted a neutral white that didn’t read warm or cold. I’ll spare you with all the trials I ran and cut to the chase, for me, it’s Sherwin Williams Pure White (Please note that paint colors look different in every home and it’s a good idea to do your own sampling). The rooms would be color drenched for a calm aesthetic that wouldn’t compete with the angles of the ceiling or furnishings. I explained to my painters multiple times that I wanted everything painted in one color, a flat finish for the walls and satin for the trim.
So, I was shocked when I walked in and saw the trim so obviously painted a different color than the walls and definitely more reflective than a satin finish.

The board is SW Pure White in satin. Trim & door are semi-gloss in a different shade.

Definitely not the same color.

I pointed out the obvious color mistake… only to have an entire painting team try and gaslight me by insisting that it was the same color with the sheen of the trim throwing the color reflection off. An optical illusion. It wasn’t until I painted a sample board and leaned it up against the trim, AND found this can under a pile of drop cloths, that I was able to have my contractor back me up.
The painters’ explanation quickly shifted to “this is a more expensive paint with no additional charge.” Yeah, sure. Ultimately, the team repainted all of the trim to match the walls, and it’s beautiful!
I hit another snag this week with the sofa. A delivery disaster might be turning into a happy accident, but I won’t know for sure until next week.
Selecting a sofa was challenging. I wanted one delivered by Thanksgiving so it had to be in stock, and it had to be deemed ‘comfortable’ by my husband. After multiple trips to two different local stores that carry a rotating selection of one-of-a-kind gorgeous furniture pieces purchased right off the showroom floor, I made my decision. A lovely beige sofa arriving that same afternoon. To my horror, I watched the brand new sofa unload off the truck with matching stains on each arm. Sadly, the sofa was not wrapped properly and damaged in transport. I refused the delivery. Side note, my husband never thought it was comfortable but we already know that his vote is often overruled.


With my rug and pillow samples in hand, I went to one of the popular chain stores in hopes of finding my happy accident. The salespeople thought I was crazy hauling cushions to the front windows to see everything in natural light. After my delivery disaster, I was determined.

New sofa possiblilty
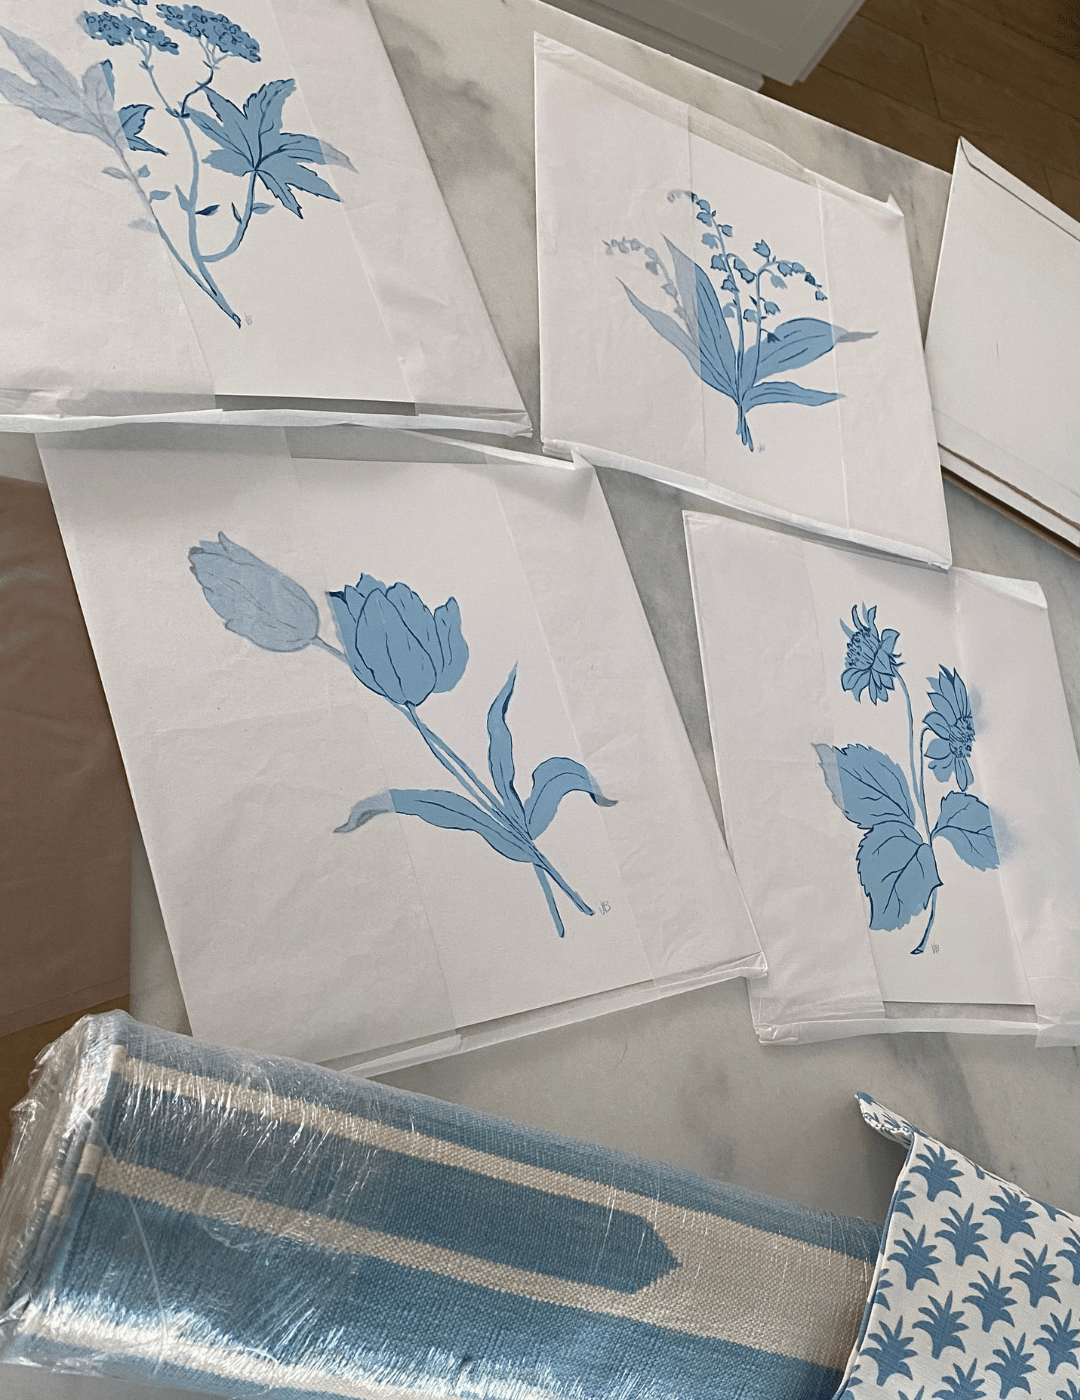
The best news of the week was the arrival of these gorgeous paintings! They’re designed and custom painted by the extremely talented Virginia Beshears. She’s incredible and was able to color match just by looking at the images of the rug long before it arrived. I had no idea what the collection would look like and was overjoyed by the beauty of each painting as I opened them up. Saying they bring me joy is an understatement. Chef’s kiss, Virginia!

This room is part of the fall One Room Challenge®, be sure to check out all the amazing transformations going on!

English Conservatory Meets Florida Sunroom - Design Changes
Well it didn’t take long to realize my coveted vintage dhurrie rug won’t play nicely with the living room side of my open floor plan. Looks like my daughter’s (former) room will be getting a vintage rug and I’ve found a beautiful alternative.
Welcome back to the evolution of my Florida home. If you’ve missed any of this One Room Challenge series you can find weekly updates here: Intro, The Plan, Custom Windows, Design Changes & lighting, Renovation Reality
Well, it didn’t take long to realize my coveted vintage dhurrie rug won’t play nicely with the living room side of my open floor plan. Looks like my daughter’s (former) room will be getting a vintage rug and I’ve found a beautiful alternative. The change in rugs shifted the layering in the pillow plan along with a different jute rug. I ordered this custom colored rug pad—if you’ve ever had a natural fiber rug then you know how the pad can annoyingly show through the open weave.

I adore my gorgeous PGT windows and didn’t want to obstruct the view with a heavy light fixture. I went in search of an organic shaped fixture that felt ‘bird-like’ (or flying saucers).


The fixture’s perfect for this space and has a lovely glow at night. It’s been discontinued, but this one has a similar vibe.
I’ve been spending a lot of time figuring out some of the landscaping you see through the sliding doors. Everything’s a process around here that goes before the committee of one and she can’t make up her mind :). This next week is a big delivery week with lots of things arriving including my sideboard.
I’m once again hurrying to get this post up for the fall One Room Challenge®. Below is an updated plan for creating this room!
Updated plan for this room -


English Conservatory Meets Florida Sunroom - Custom Windows with PGT
When I was growing up in California I never imagined I’d experience three hurricanes - Sandy(NJ), Irma(FL), and Ian(FL). Ian hit during our renovations, after our impact windows were order but long before they were installed.
All PGT windows in this project were purchased by me, with the exception of two custom triangular windows. For those, I worked in collaboration with PGT and wanted to share the process as well as my opinion.
Welcome back to the evolution of my Florida home. If you’ve missed any of this One Room Challenge series you can find weekly updates here: Intro, The Plan, Custom Windows, Design Changes & Lighting, Renovation Reality
When I was growing up in California, I never imagined I’d experience three hurricanes - Sandy (NJ), Irma (FL), and Ian (FL). Ian hit during our renovations, after our impact windows were ordered but long before they were installed. With months of planning and revisions behind us, the two largest investments of this project (windows/sliders and roofing) had been decided. My biggest takeaway from this saga has been to take your time and do your research on home improvements that last well into to the next owner, decades from now.
I wanted my home to look like it had always been here, one of the originals that was well loved and updated to withstand a category 5 hurricane (only partially joking).

House Rendering
I knew I wanted a metal roof for charm and durability, and I wanted to find impact windows that offered the same. My contractor recommended PGT windows because of their performance quality and company reputation. They’re based in Florida, have a reasonable order turnaround, and he’s installed them many times on previous projects. They’re also fully customizable. After visiting a showroom, I was sold.
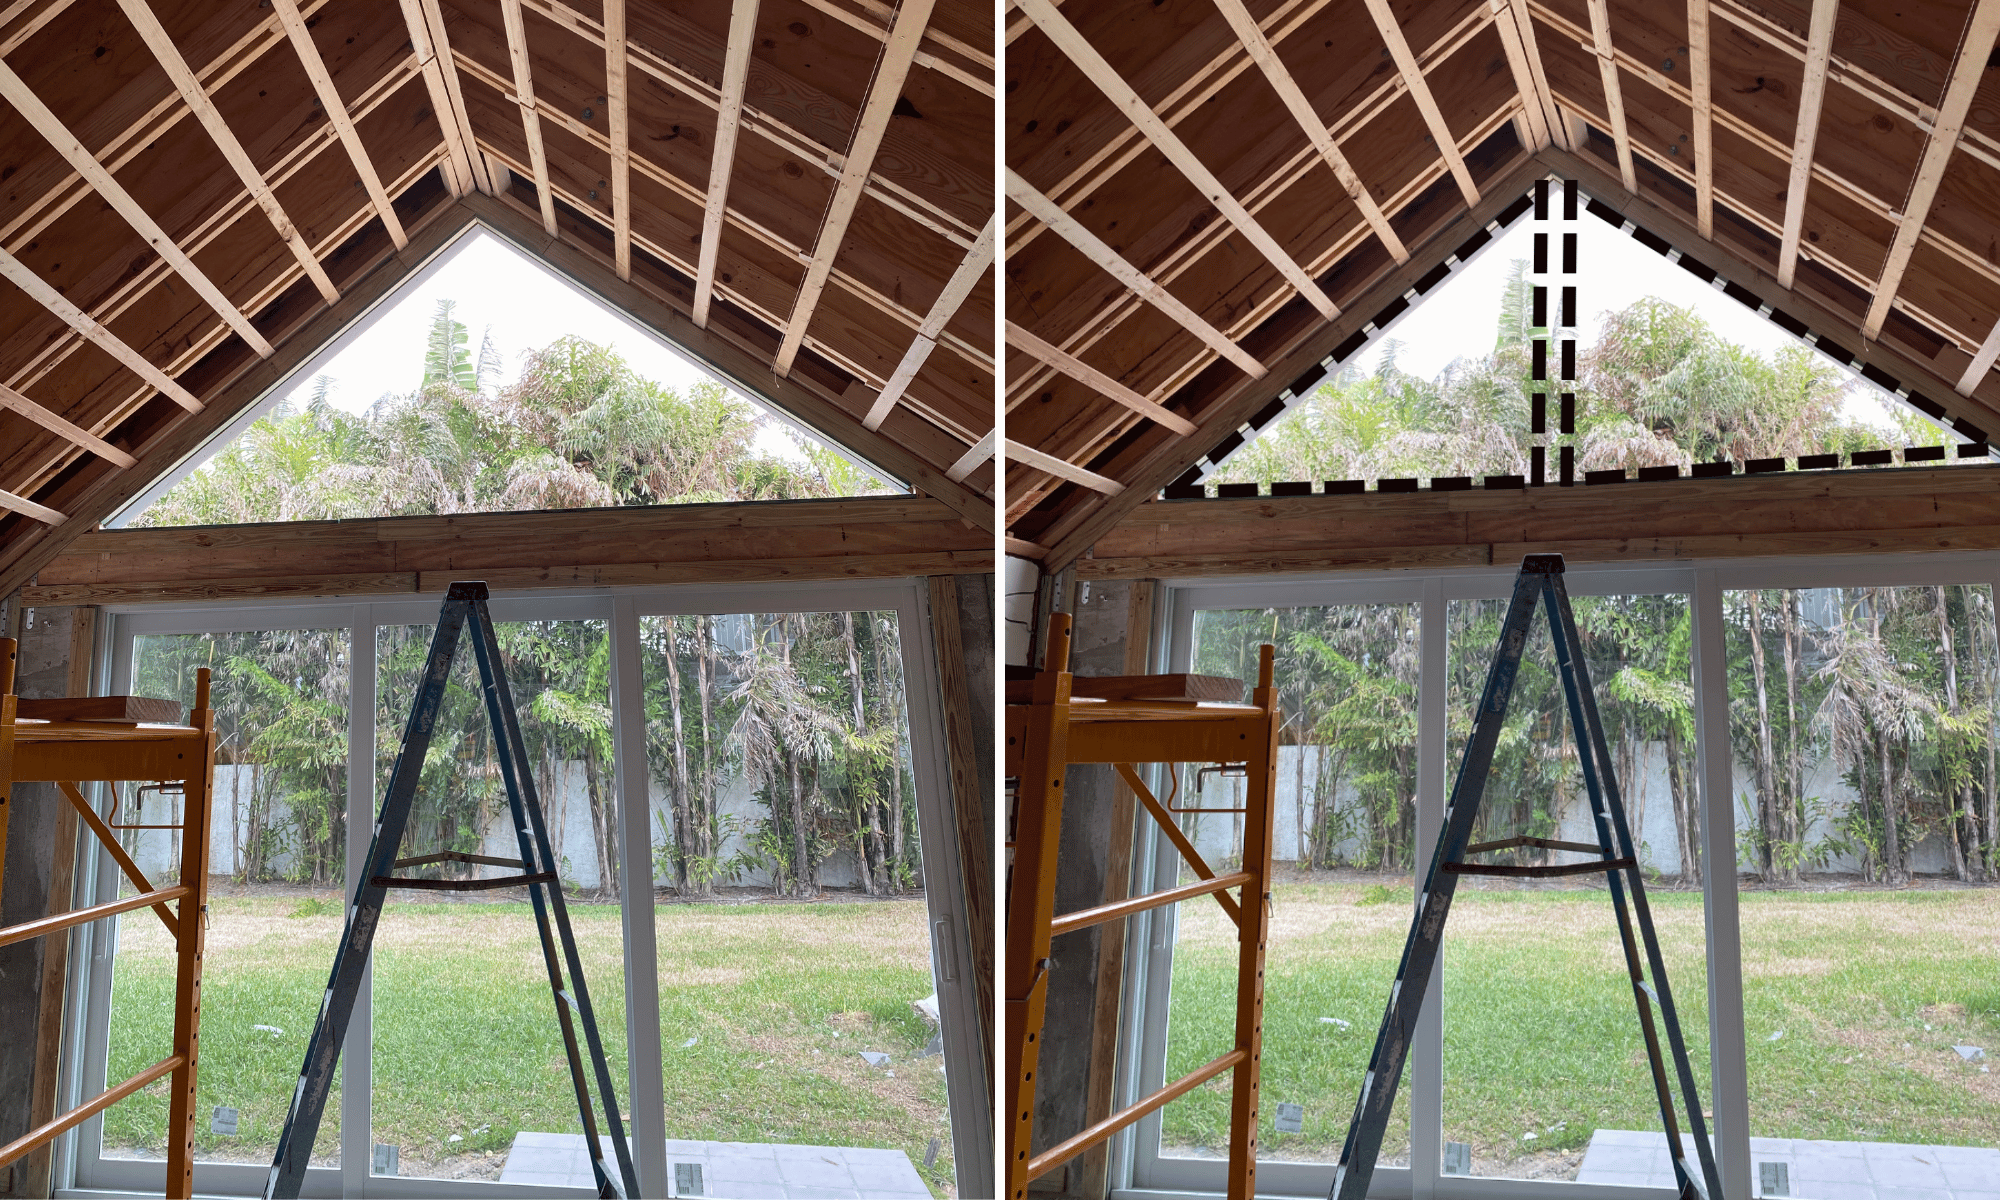
I worked with an architect on some of the project and I liked his proportions on the window specs. It was his idea for aluminum casement windows with custom raised flat bar mullions applied. The structural engineer was not my friend most times. He interjected too often with his design opinions when all I wanted to know was if my ideas would withstand a natural disaster.
The upper dormer windows are stationary with a 1” flat bar mullion applied. The design resembles many of the windows found in the historic section of town with all the modern features you would want today.

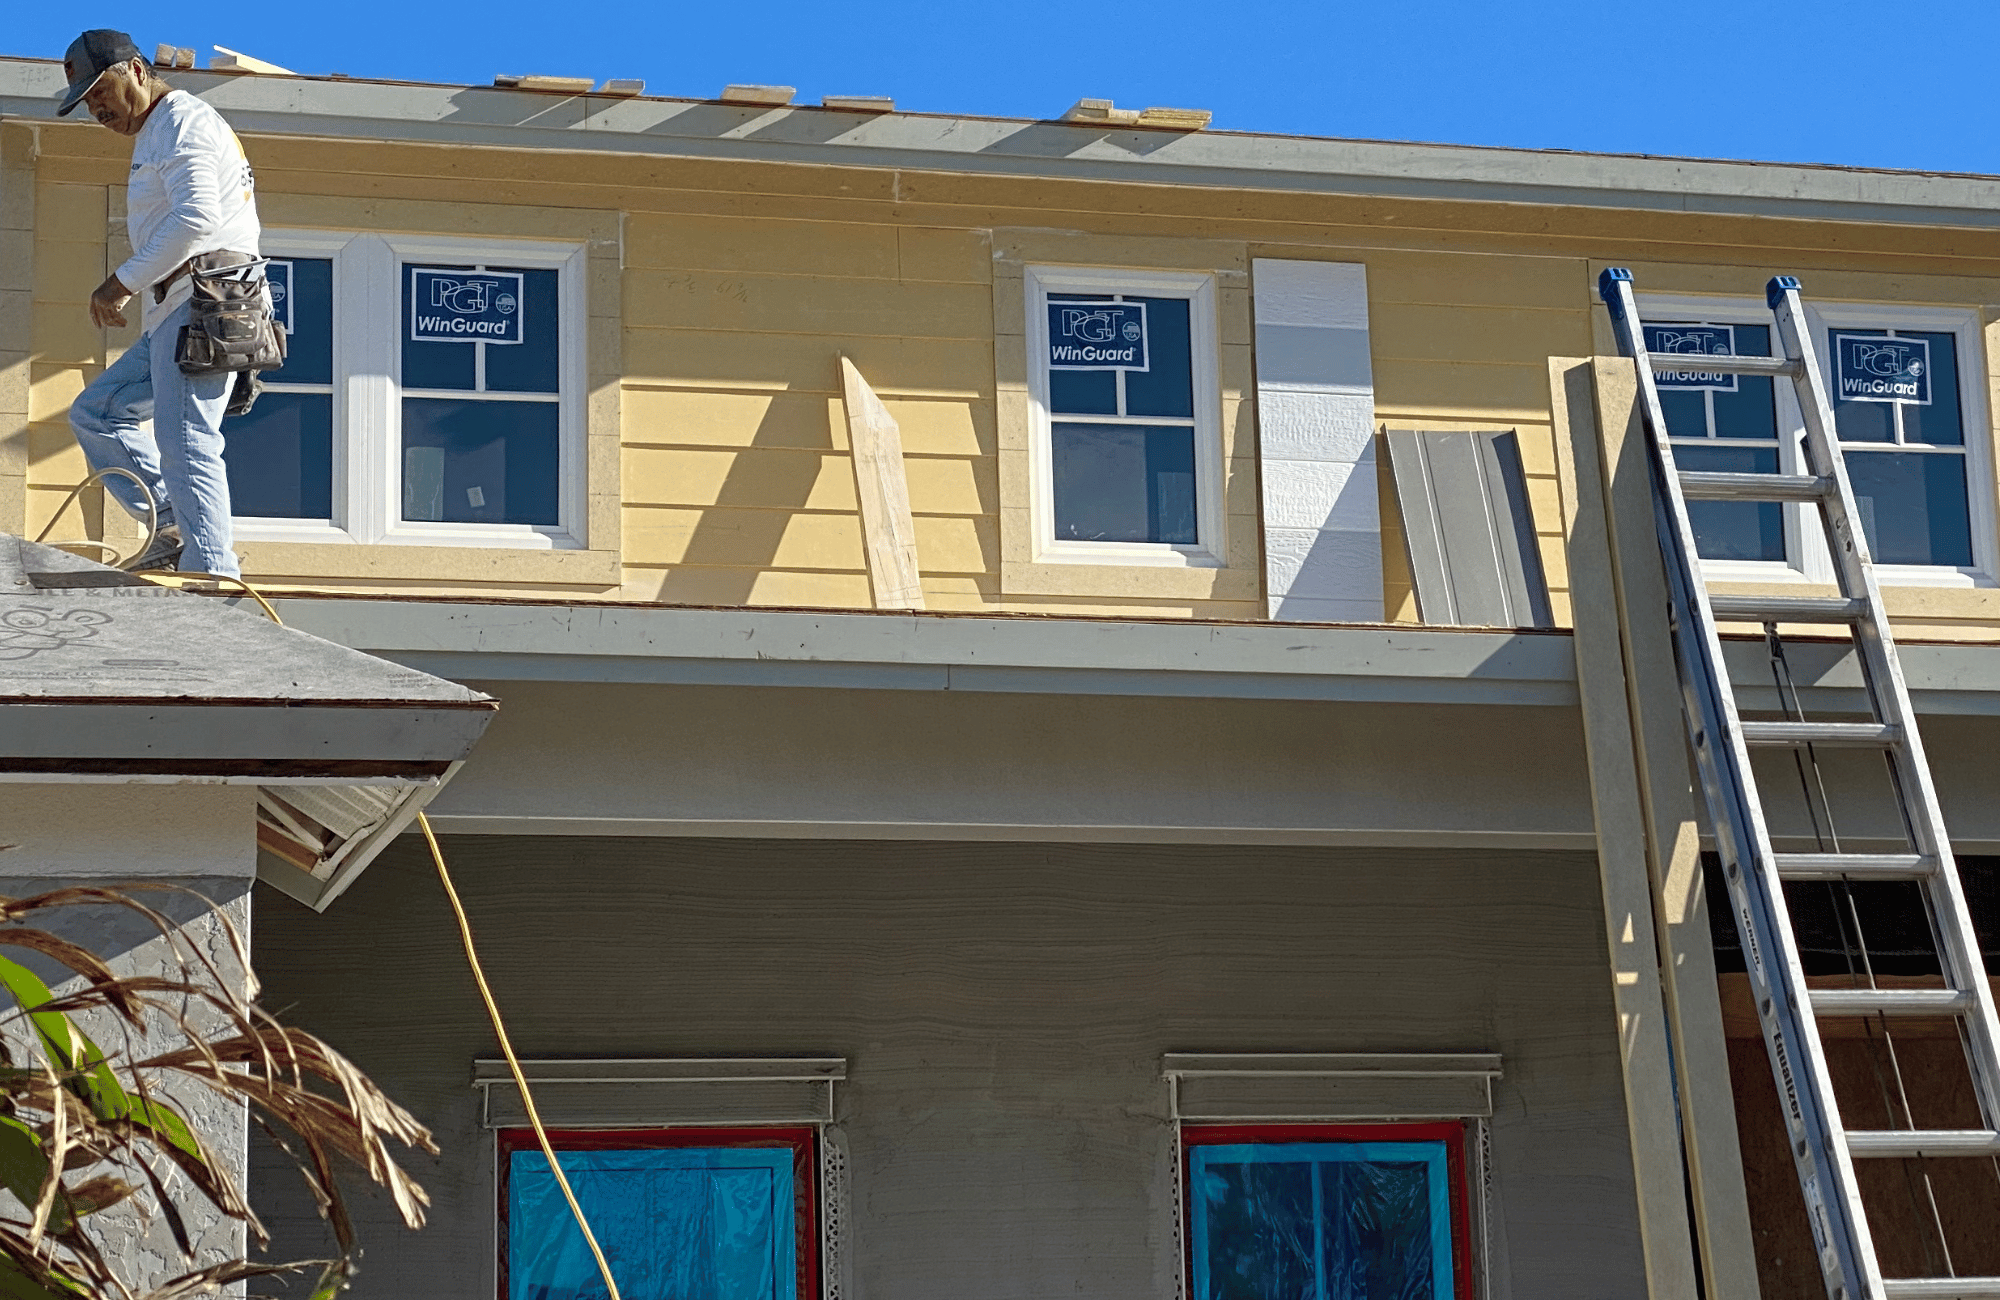
Never too early to audition house colors against a sample piece of roofing - the crew was so tired of me :)
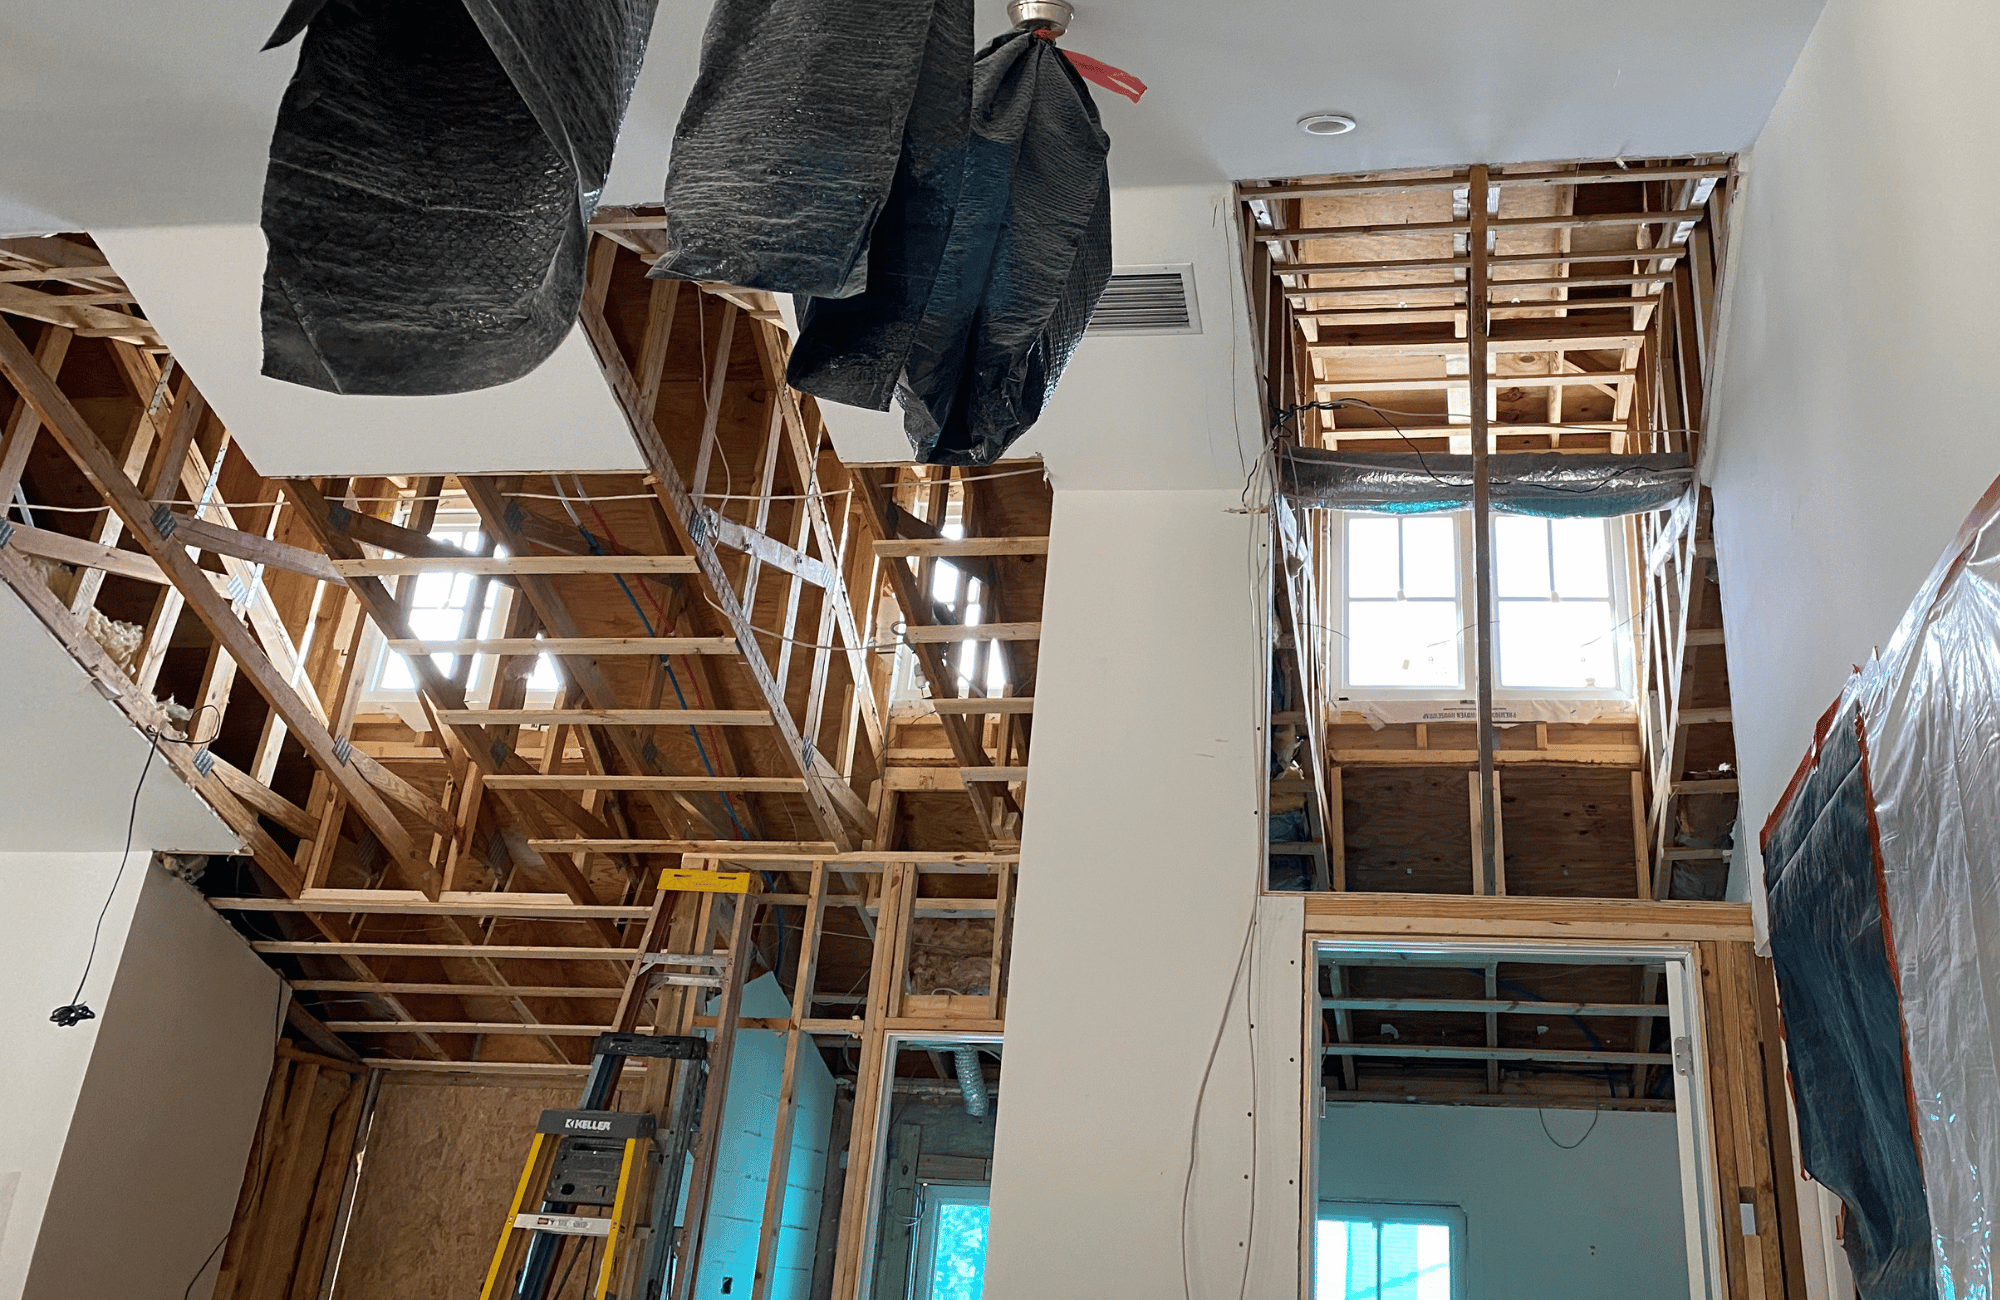
Once the ceiling was raised and the window opening was framed, a PGT representative came to measure for the custom windows. There’s no room for error on this step. The PGT sliders are twelve feet wide by eight feet tall with the middle section stationary and both, right and left, sides open. Finished ceiling height is over thirteen feet!
I was a bit worried about matching the specs on the other windows while incorporating a triangular shape that didn’t feel too modern for our home. The rooms are open and you can see all the windows together so it had to feel cohesive.

When the windows arrived, I was very nervous about the install. Florida homes are concrete block and you can’t easily make adjustments to window openings.


The scaffolding is braced on boards cantilevered over the open trench for pool plumbing. I don’t think I could have been more worried.


And then came time for the second window and an additional helper. They were heavy!
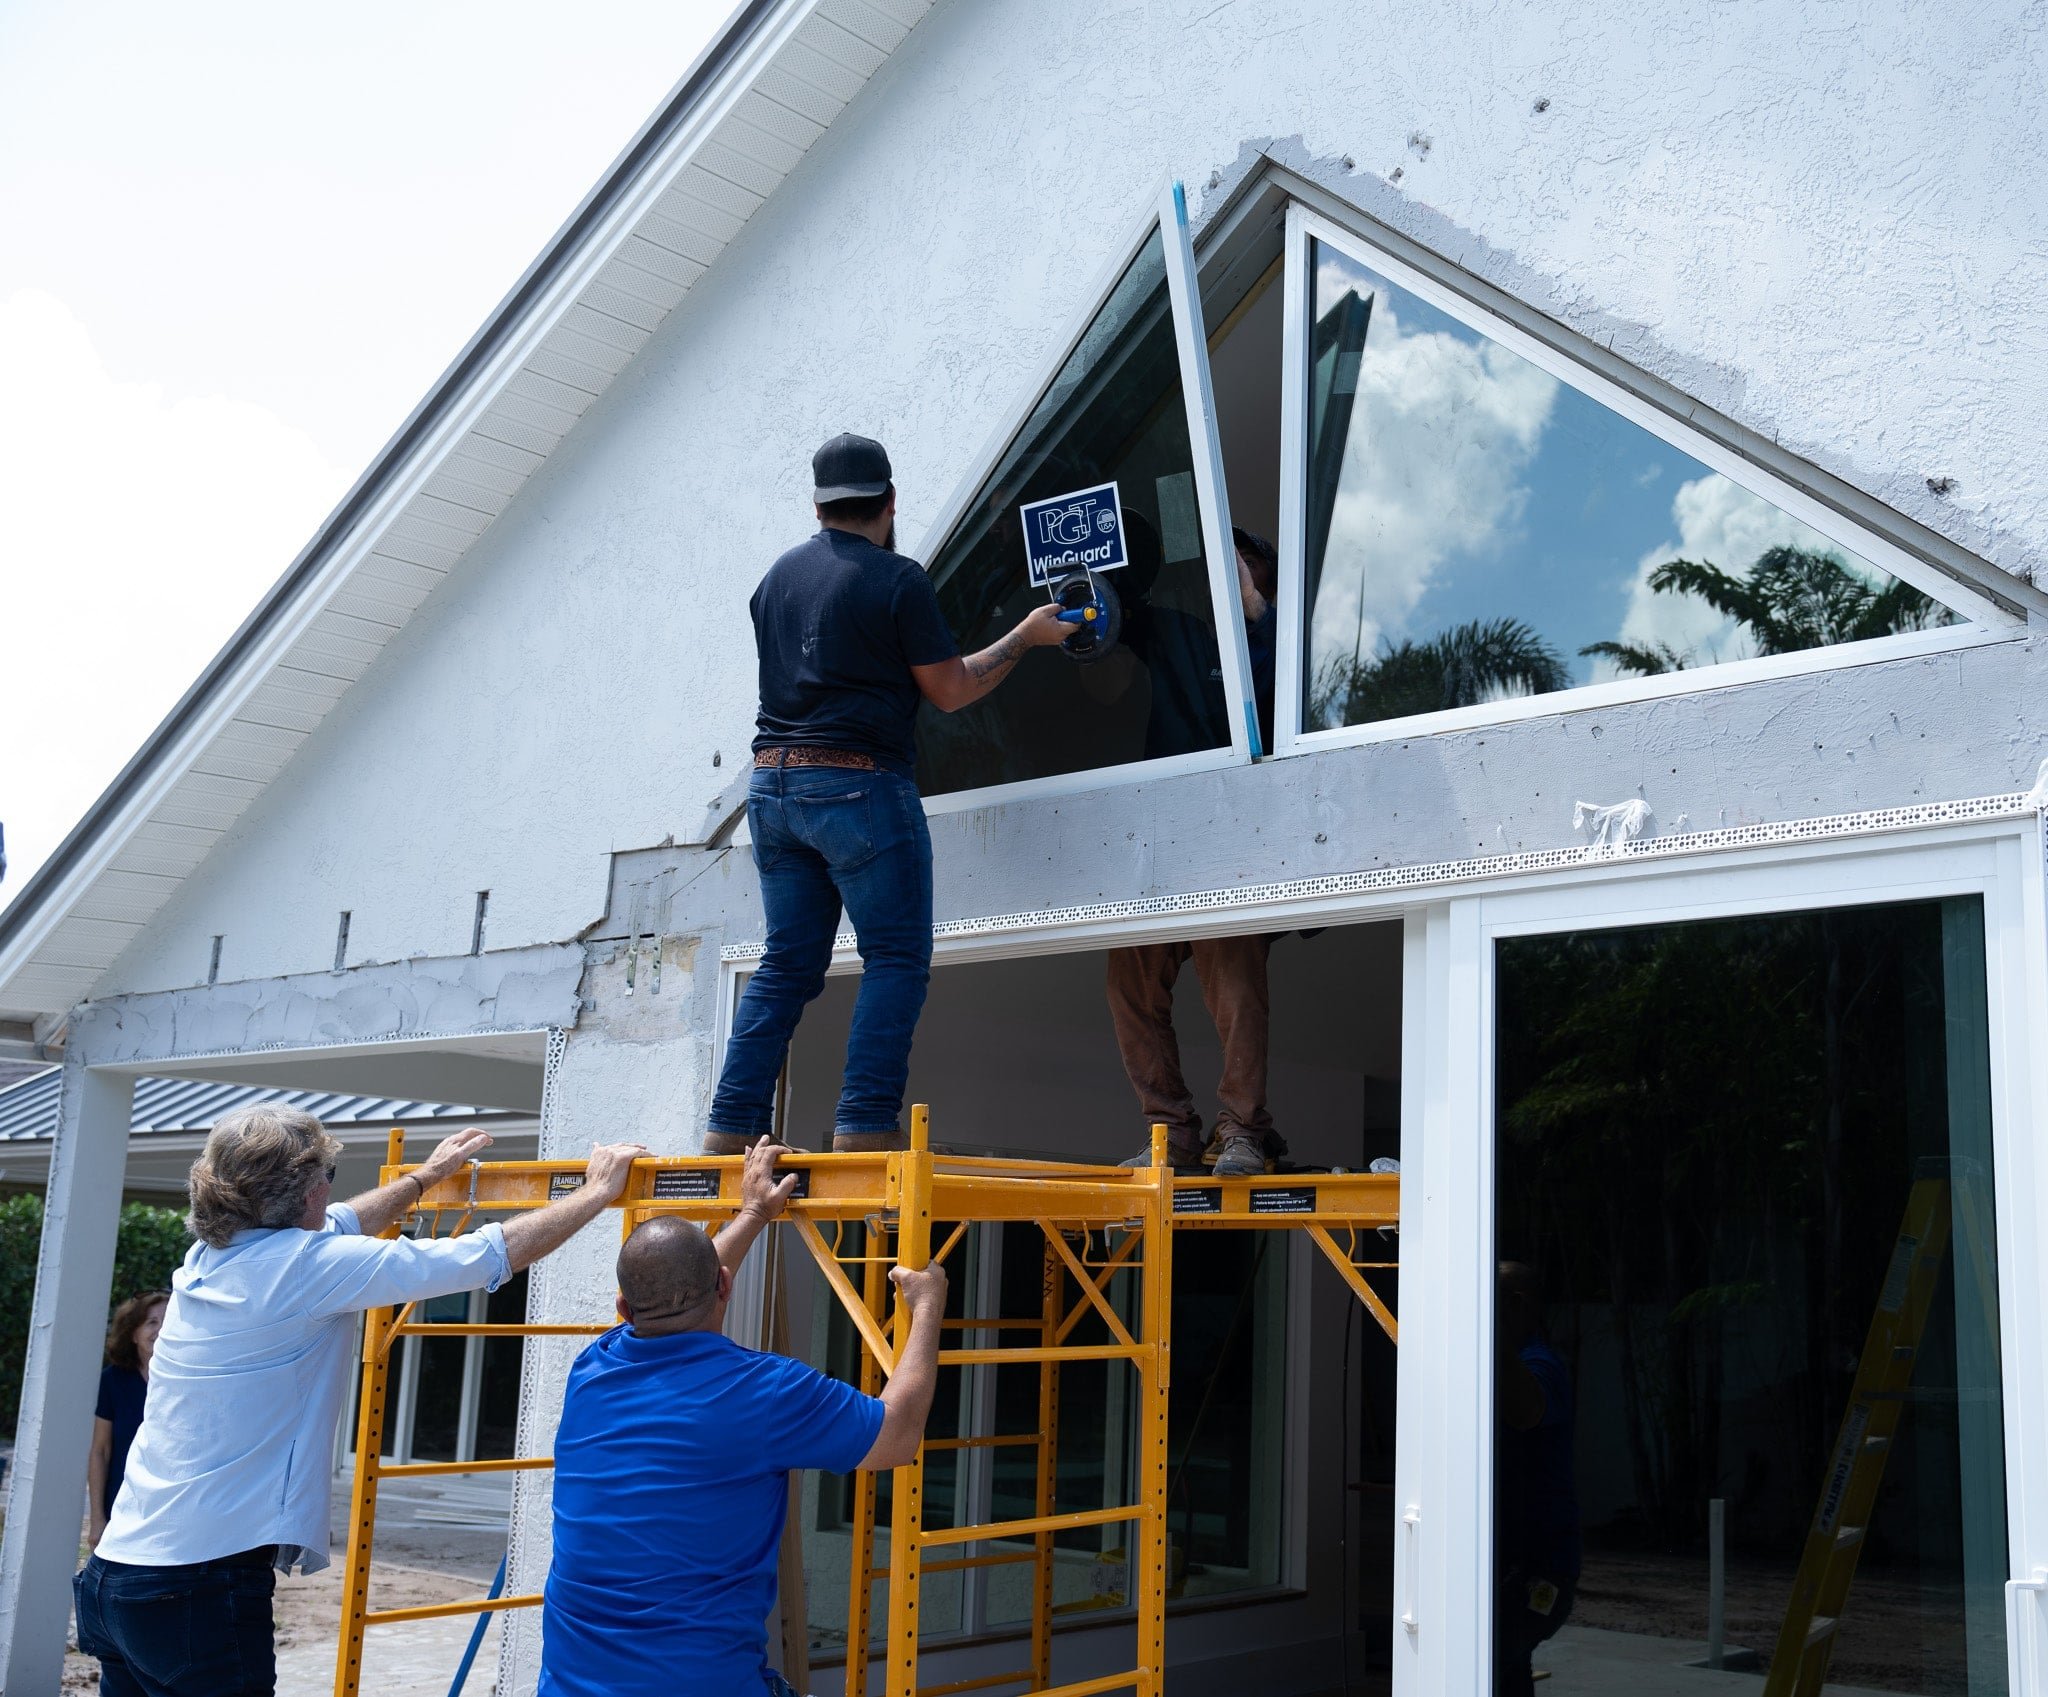
This shot reveals the perfectly measured windows installed with expert craftsmanship. I’m feeling relieved and happy.

And here’s where we’ve left off from last week.
Thanks for checking in on my room transformation progress. Impact windows and other smart home investments can sometimes be confusing so I hope I’ve been able to provide some helpful information. The improvements I’ve made on this home reduced the cost of my hurricane and homeowners insurance, so for us it was a great investment.
I love my PGT windows and can’t say enough nice things about them or the team behind the brand. I’m so appreciative PGT wanted to collaborate on the custom window portion of my project!
Be sure to come back next week when I hope to show some progress…the time is flying by. You can see all the other incredible projects of the fall One Room Challenge® here.