
How to Hang Something Heavy....Like a Pro
This is a great way to hang anything heavy....headboards, art, a shelving unit....whatever. It is actually fairly simple.

I thought I would share with you how I hung my heavy mirrors for the One Room Challenge. You want to use a Z Bracket

Now you can buy one, or what I prefer....you can make one. In the carpet section of your local home improvement store, you will find this

A piece of metal carpet trim with the perfect bend already in it. You will need a piece twice the length of your object (one length for the wall, one for the piece). You can cut this with a hacksaw or nippers (the holes are already drilled in it). Next, find the perfect position on the wall to hang your object.

Attach one piece of the carpet trim (channel side facing up) to the wall. You can see that the studs are not center...it doesn't matter, as long as you use long screws (I like 3") and span at least 2 studs to anchor the bracket within the placement. In this case, there are 2 studs available. Physics will do the rest. I can't tell you exactly how, because I was absent that day ;).
Attach the other piece to the back of your heavy object
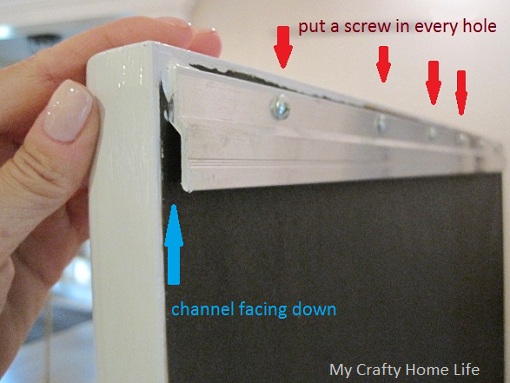
Make sure the channel is facing down on this one. Also, put a screw into every hole. Here, you will only need screws long enough to grab the wood. Slide the object (mirror in this case) down over the wall bracket, and you have a flush mount for a heavy object. Now for the professional touch

Add a rubber bumper (1/2 or 3/4) depending on your depth needed....to the bottom corners of your piece

This will keep it the perfect distance away from the wall, and help hold it in place. That's it!

Tight to the wall,and you did not have to do endless equations to find the correct stud position.