
Spring Into Action!...The Reveal
Hi Everyone, and thanks for coming back to Spring Into Action. I have been working on shelving for my basement...along with a dehumidifier. If you are new here, you can start at the beginning of this here.
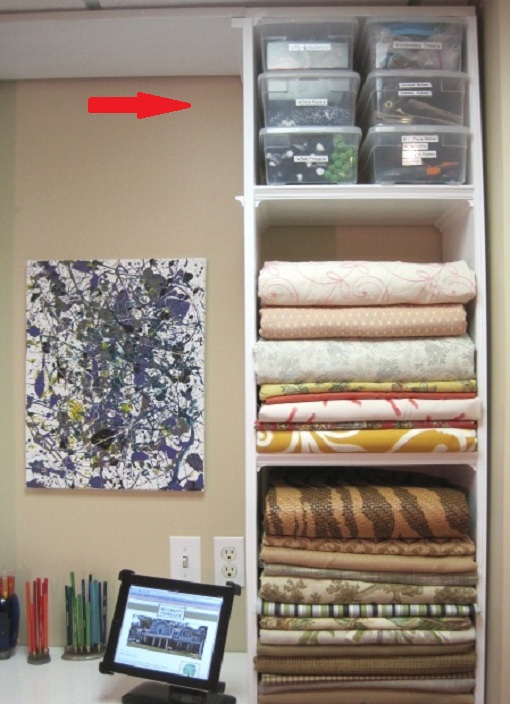
A quick refresher....this is how my space started

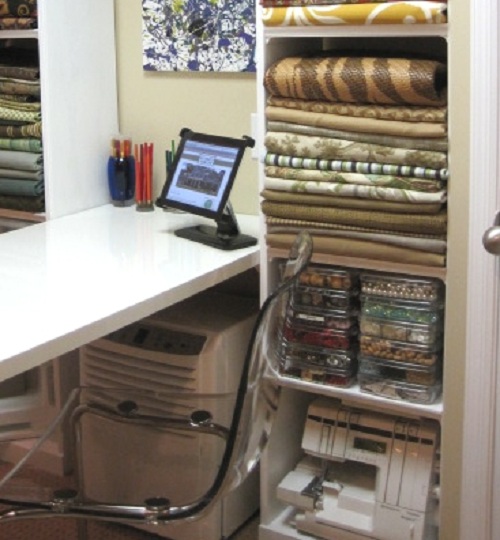
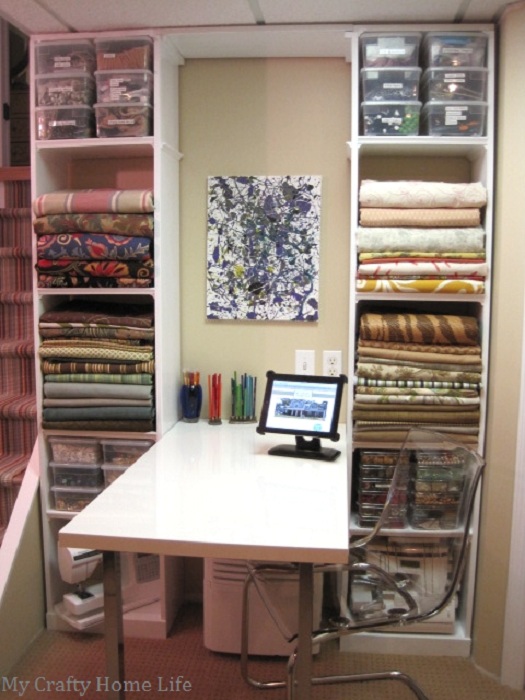
This is how it looks now

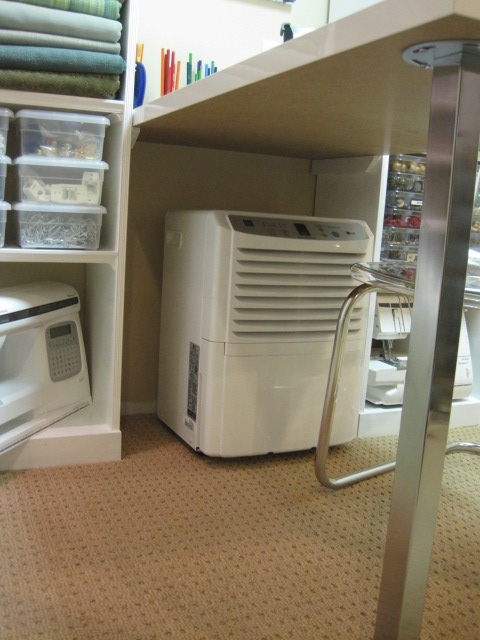
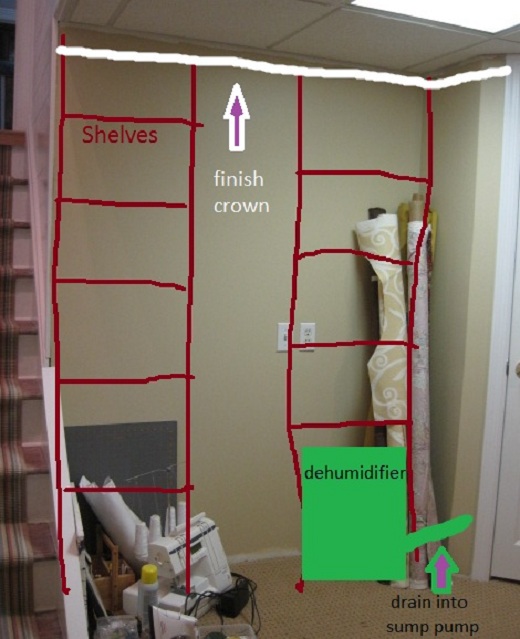
I made a few deviations from the original plan. For one, I moved the dehumidifier in between the bookshelves
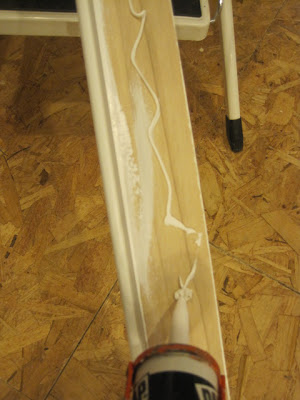
Remember the awkward cleat problem
I also re-sized all the shelves to fit the boxes....exactly (I became rather obsessed at this point)
I would say that the happy accident was finding out that I had room to fit this Ikea table top in-between the shelves

This project went up until the end for me. On Tuesday, I was painting in the garage until midnight. Late last night I was trying to take pictures for you....and the lighting in the basement is not the most desirable. I actually did not complete everything. I still need to add the molding at the top, and an additional shelf in the middle section.
I am not complaining. If it was not for this deadline, this would not be finished! I was able to organize my fabric so well, that on Monday I will be having a FABRIC GIVEAWAY!! Please come back for that.
....and now, let's go see how my DIY virtual partners did
Kerry - Design Du Monde
Jean - Flower Hill Design
Becca - From Gardners 2 Bergers
Carrie - Hazardous Design
Sam - The Junk House
Tiffany - Living Savvy
Nancy - Powell & Brower Home
Lisa - A Room With A View
Cathy - Room RX
Suzy - Saved by Suzy
Laurie - Traditional & Modern
Spring Into Action (week 2) & a Waffle
Welcome back to week 2 of Spring Into Action. I am tackling my basement shelving that I have been procrastinating for over a year! You can go to the beginning, here. There are 11 other bloggers working on their DIY's, too.
Before I tell you about my progress....my window boxes are onDancing With the Stars The Waffler. Where America blogland gets to vote for their favorite. If you have an extra "click" in you today...go here, and vote for your favorite look for my house! If you are feeling indecisive about something in your life, have The Waffler poll blogland for a vote.
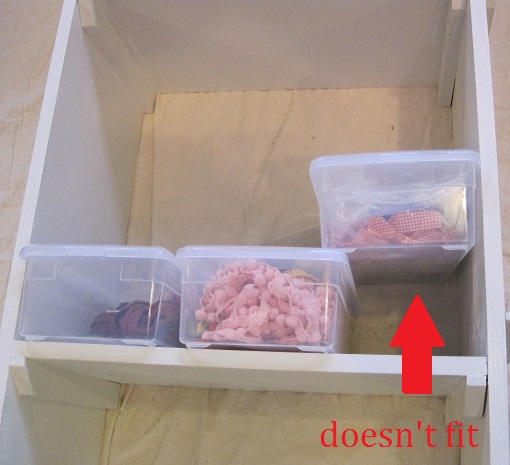
Now, back to the basement shelving. Here is my old shelving that no longer fits
It is just 1x12 pine boards that I cut down. As you can see, I used large cleats to hold the shelves
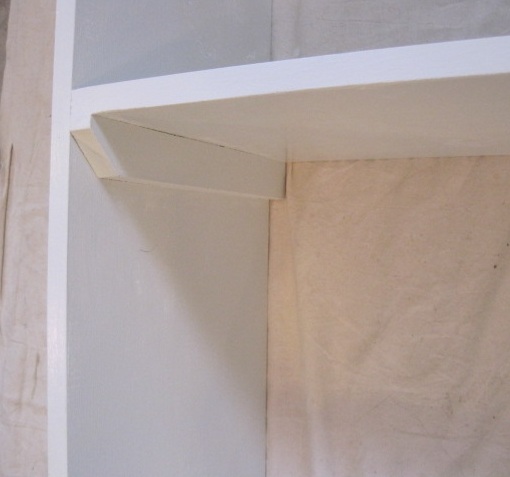
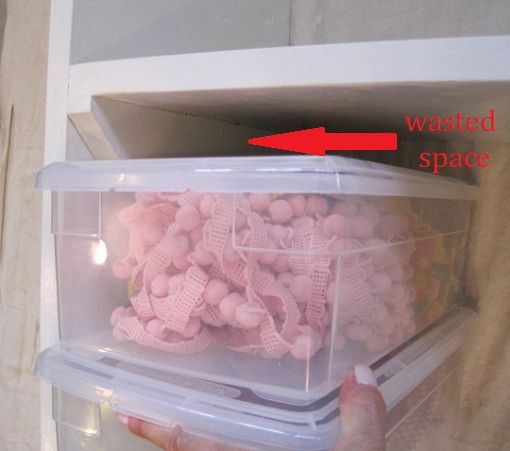
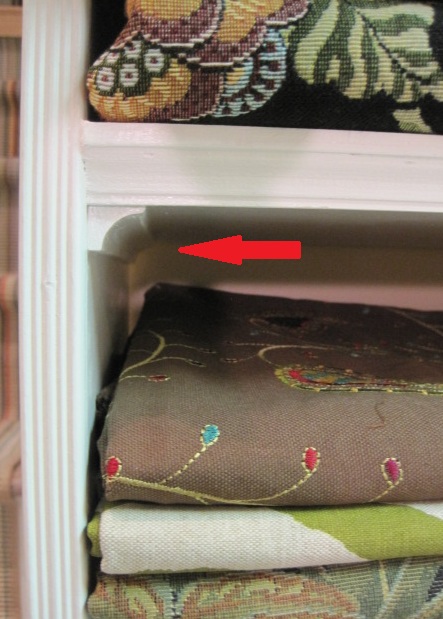
The large cleats prevent storage boxes from stacking neatly. Also, the shelves are an awkward width
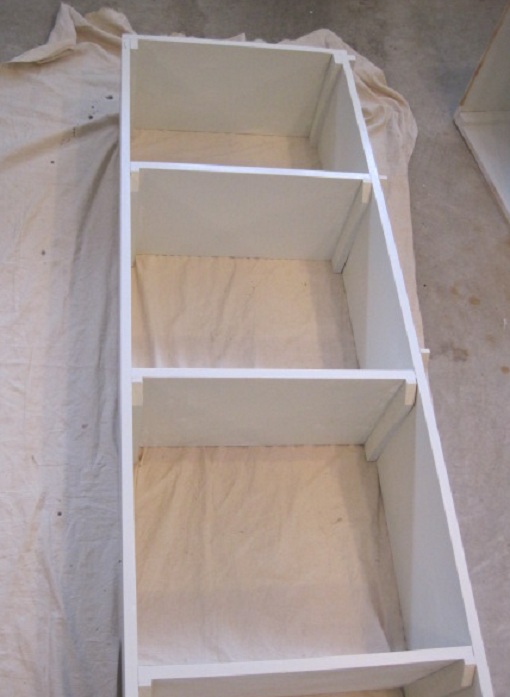
More wasted space! Since I need to chop them up, anyway......might as well (famous last words) really make them custom. I disassembled the shelves
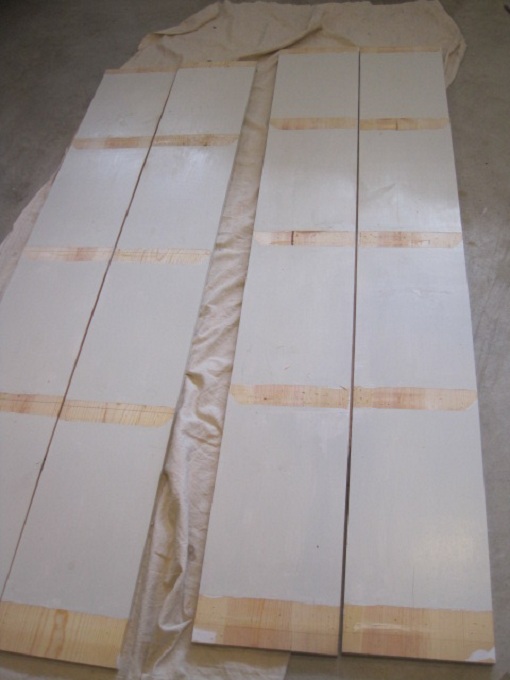
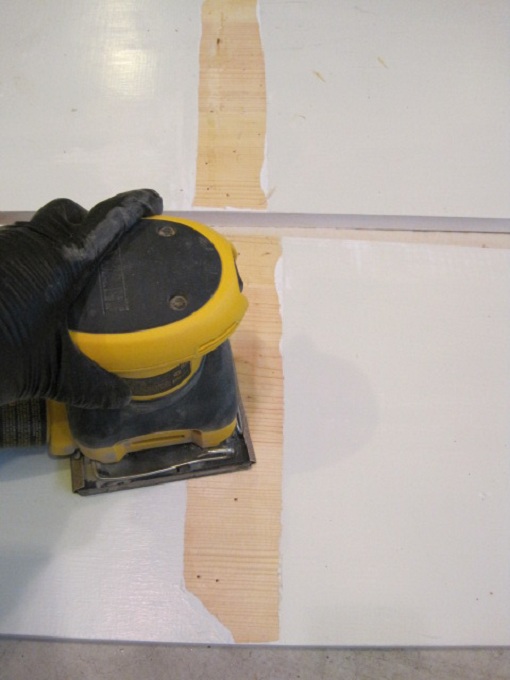
Sanded all the rough spots from the previous glue, etc
...now I need to measure and reassemble. I have 1 week left for that. As for the dehumidifier....I wanted to install a hose to the back
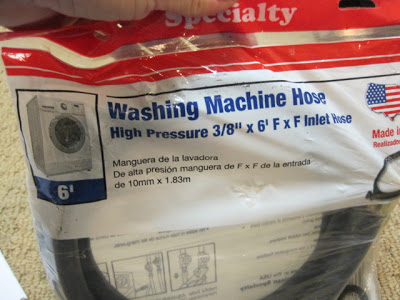
Here are the parts
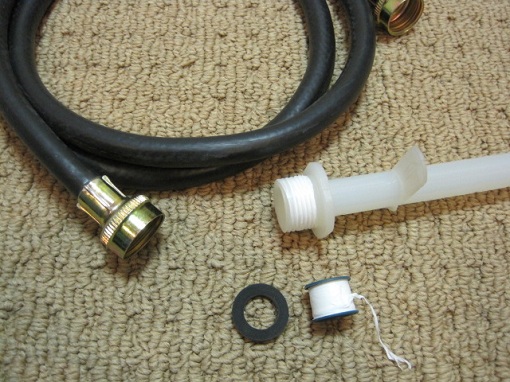
I followed the manufactures instructions
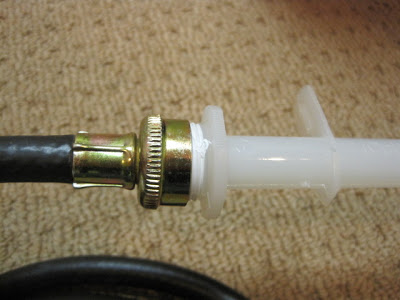
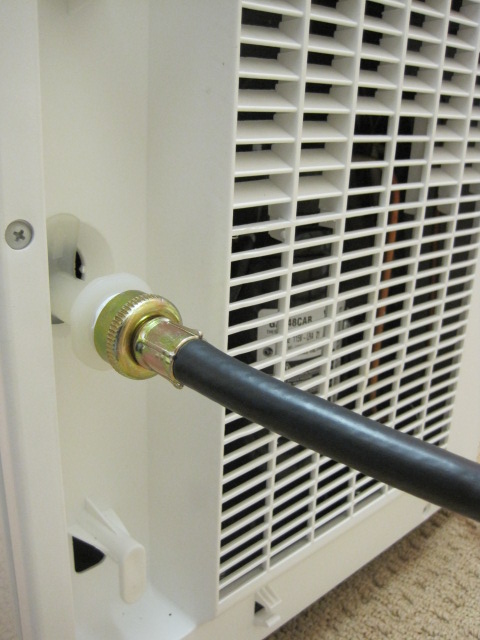
...and this happened
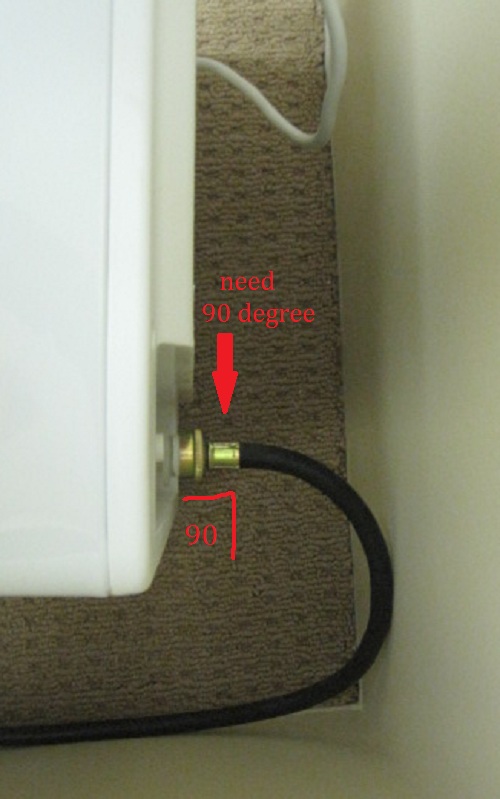
I can't get it close to the wall (insert bad words)! I need a 90 degree bend so the hose will lay straight. I can't imagine why I procrastinated on this project. it has been nothing but fun? Looks like I will be spending this lovely weekend in the basement. Come back next week to see if I put all of this curbside for bulky trash! To see the reveal, go here.
Now let's see how the other projects arefailing doing!
Kerry - Design Du Monde
Jean - Flower Hill Design
Becca - From Gardners 2 Bergers
Carrie - Hazardous Design
Sam - The Junk House
Tiffany - Living Savvy
Nancy - Powell & Brower Home
Lisa - A Room With A View
Cathy - Room RX
Suzy - Saved by Suzy
Laurie - Traditional & Modern
Before I tell you about my progress....my window boxes are on
Now, back to the basement shelving. Here is my old shelving that no longer fits
It is just 1x12 pine boards that I cut down. As you can see, I used large cleats to hold the shelves
Here is part of the problem
More wasted space! Since I need to chop them up, anyway......might as well (famous last words) really make them custom. I disassembled the shelves
Sanded all the rough spots from the previous glue, etc
...now I need to measure and reassemble. I have 1 week left for that. As for the dehumidifier....I wanted to install a hose to the back
Here are the parts
I followed the manufactures instructions
...and this happened
I can't get it close to the wall (insert bad words)! I need a 90 degree bend so the hose will lay straight. I can't imagine why I procrastinated on this project. it has been nothing but fun? Looks like I will be spending this lovely weekend in the basement. Come back next week to see if I put all of this curbside for bulky trash! To see the reveal, go here.
Now let's see how the other projects are
Kerry - Design Du Monde
Jean - Flower Hill Design
Becca - From Gardners 2 Bergers
Carrie - Hazardous Design
Sam - The Junk House
Tiffany - Living Savvy
Nancy - Powell & Brower Home
Lisa - A Room With A View
Cathy - Room RX
Suzy - Saved by Suzy
Laurie - Traditional & Modern
Spring Into Action!
Hello, and welcome to Spring Into Action!

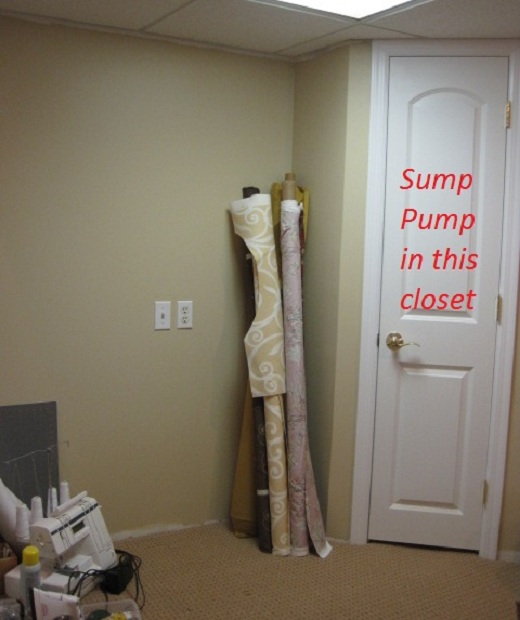
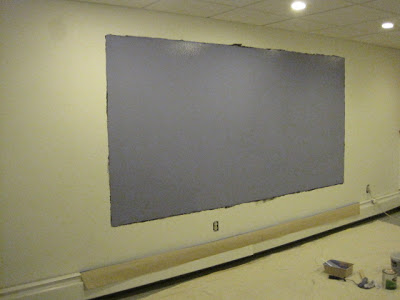
Sadly, it works every time for me. Here is my story....a while back, we installed french drains and a sump pump into our basement. Since then, I have shown you how I installed faux crown molding in the basement. I have also shown you my magnetic chalkboard wall....in the basement. Here is the wall I have left out

Before the construction, I had a full wall of home-made shelves. However, since we put in a sump pump, we now have a closet (that is only large enough for the sp) on the right...the old shelves won't fit.
I need my shelves back..what's a girl with power tools to do? My plan
I need to take apart the old shelves and chop, glue and nail them into the correct size. I also need to install a dehumidifier with a drain into the sump pump so
Now let's go see what my peer's who are pressuring me are going to tackle;
***For week 2, go here, For the reveal, go here***
Kerry - Design Du Monde
Jean - Flower Hill Design
Becca - From Gardners 2 Bergers
Carrie - Hazardous Design
Sam - The Junk House
Tiffany - Living Savvy
Nancy - Powell & Brower Home
Lisa - A Room With A View
Cathy - Room RX
Suzy - Saved by Suzy
Laurie - Traditional & Modern
Magnetic Periwinkle Chalkboard Wall
Like many things, it all starts with a request from the kids...."Can we paint the house rainbow?"..."Can we get a 3D TV?"...."Can we get a puppy?"....NO, NO, and NO! So, when the request came for a magnetic chalkboard wall....I said YES!
Starting with the magnetic primer (it is called primer because it goes under whatever you want), but this IS the magnet part

Paint about 3 coats...I think I did 4? I just used all of it! Here's a tip, if you are going to trim it with moldings...you don't need to tape it off...the trim will cover it!
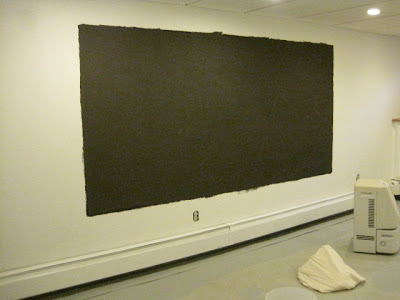
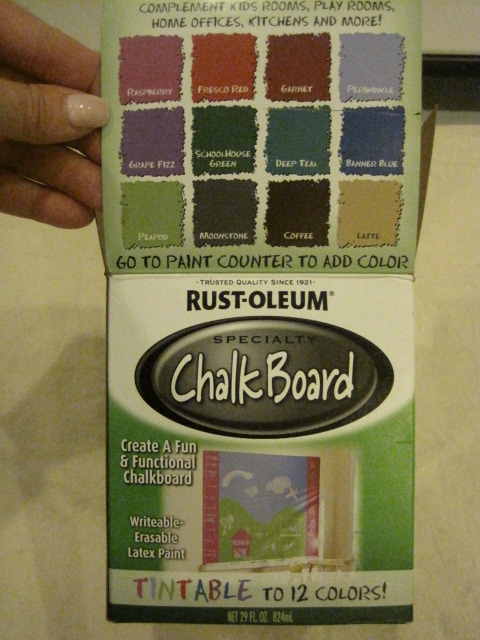
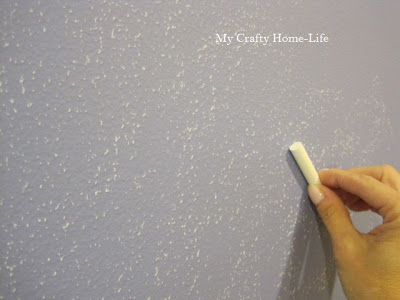
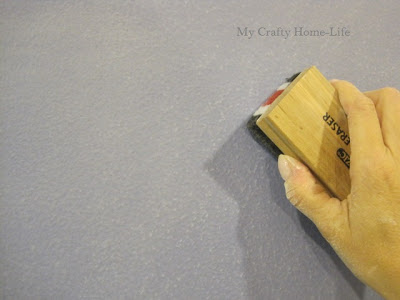
...and I chose periwinkle. Now, the metallic primer is a bit bumpy (all the metal fragments) so, it is a good idea to knock down the high spots before painting your chalkboard paint. I also did about 4 coats...I had it, might as well use it! While this was drying, I painted the rest of the room
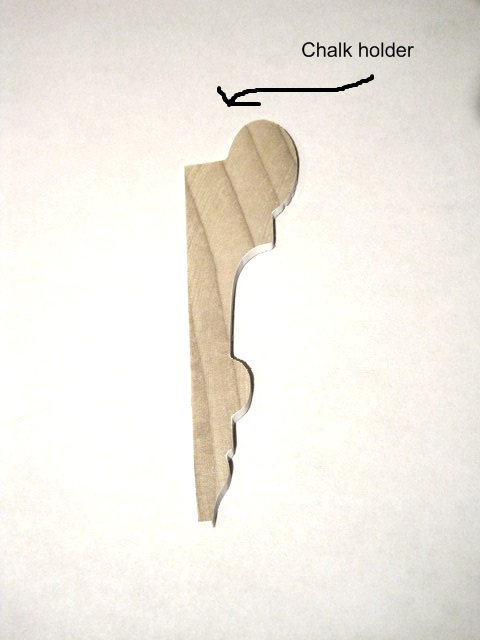
Onto framing it with molding...I wanted a thick molding that would not only frame the chalkboard, but also hold chalk! I chose this profile...as you can see, when it is flat against the wall, the chalk should fit nicely
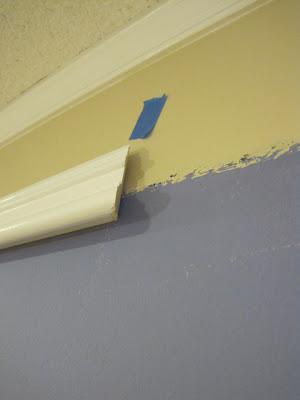
I always paint my moldings before I put them up. That way, you only need to do touch-ups for the nail holes. It is much easier than standing on a ladder and trying to paint. Like I showed you when I did the faux crown molding, I marked all the studs with blue tape.

With my usual tools, I applied the molding the same way as the crown molding
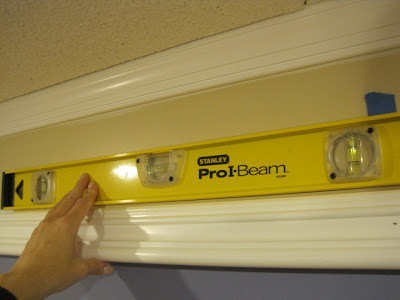
Always check for level...also be aware if there are other straight (or not) parallel lines. Here you can see that the crown molding is close. Since nothing in a house is perfectly straight, you may want to split the difference...use your eye and step back from time to time!
Now this is the part that works great, but will bother many contractors. Caulk is the best glue you could ever use! Once it is dry, it is stronger than ALMOST anything. Since the sides of my chalkboard are not on studs, I put a bead of caulk on the back of the molding to make sure that it would hold tight to the wall
I must warn you, If you ever choose to remove this molding it won't come off WITHOUT SHEETROCK coming off too! That is why contractors hate this!....but it works GREAT!

That is the periwinkle chalkboard wall....however, you still need to "condition it". Say what?? I needed to google this. After waiting 3 days for the paint to cure,take a piece of chalk on its' side and rub it all over the new surface.
Use an eraser, and wipe it all down...NOW it is ready!
You can use magnets to hang EXTRAORDINARILY talented artwork...if I do say so myself...and you can color on the wall.
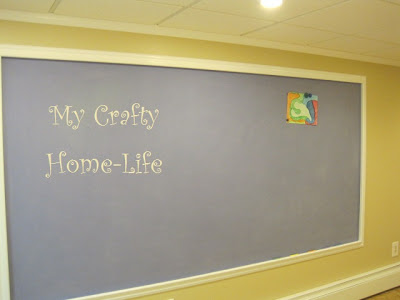
All the chalk fits nicely in the groove
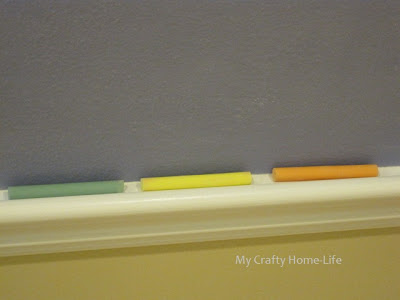
I have just enough chalkboard paint left over for a few small crafty projects...any ideas?
Basement update Faux Crown Molding
Well, I have been hard at work on my basement. This is how you last saw it

The drainage system was finished

I sealed the concrete, and had this subfloor installed

It has rubber cleats to keep it off the cold (hopefully never damp) concrete
I DID NOT do it myself...I called Joe & Mike...mysecond husband's contractors. Now, it looks like this

Onto the fun stuff...I wanted crown molding. There is only one problem, I have a drop ceiling...looks like it is going to be faux crown molding

I marked all the wall studs with blue tape. It is super easy to find a stud on a drop ceiling...you just lift the tile

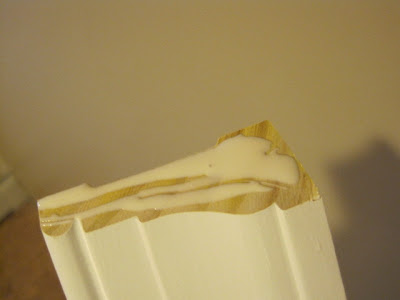
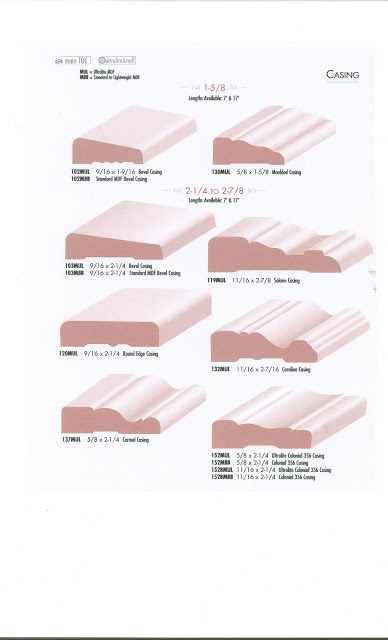
and you can see the stud. Since I can't nail into the ceiling, I decided to use door casing molding
It has an interesting profile, lays flat....and is super inexpensive! Using my usual tools, I mitered the corners

When it came to a long run, I used a 30 degree cut...making sure that the joint would fall on a stud. That way, the nails would pull it together

add a bit of glue to the other cut

Here is how it looks now


and that joint...

almost invisible. Tomorrow I will show you the other side of the room. Hint...the kids made me do it! The carpeting is going down this week. This was a long project! How long is your average project? Do you finish it before you start another one?
****Update - Magnetic Chalkboard Wall****
The drainage system was finished
I sealed the concrete, and had this subfloor installed
It has rubber cleats to keep it off the cold (hopefully never damp) concrete
 |
| Source |
I DID NOT do it myself...I called Joe & Mike...my
Onto the fun stuff...I wanted crown molding. There is only one problem, I have a drop ceiling...looks like it is going to be faux crown molding
I marked all the wall studs with blue tape. It is super easy to find a stud on a drop ceiling...you just lift the tile
and you can see the stud. Since I can't nail into the ceiling, I decided to use door casing molding
 |
| Source |
When it came to a long run, I used a 30 degree cut...making sure that the joint would fall on a stud. That way, the nails would pull it together
add a bit of glue to the other cut
a few nails, wipe of excess glue, fill in the holes...and sand
Here is how it looks now
and that joint...
almost invisible. Tomorrow I will show you the other side of the room. Hint...the kids made me do it! The carpeting is going down this week. This was a long project! How long is your average project? Do you finish it before you start another one?
****Update - Magnetic Chalkboard Wall****
Jingle Bark & Holiday Humor
I guess I have been working on my basement too long....or smelling the paint fumes....because, I find this funny! My faux crown molding post is not ready yet, so enjoy
This weekend I will be watching my favorite Holiday movie, Love Actually

...and here is one of my favorite "always make me laugh, no matter how many times I have seen it" clips
Back to the basement for me. Do you have a favorite Holiday movie?
This weekend I will be watching my favorite Holiday movie, Love Actually
Back to the basement for me. Do you have a favorite Holiday movie?